
In a recent project, I was challenged to try and build a Copilot in Copilot Studio that would update a Dataverse table AND update a Business Process Flow (BPF). On its face, its not too crazy. These are classic components of the Power Platform. However, after a few days, it turned into quite the endeavor. One thing that kept sticking for me was I wanted any flows/topics/actions connected with the Co Pilot to be dynamic in nature so it could be used over and over. This will be a LONG post as it requires quite a few setup and configuration items, but it is well worth running through it.
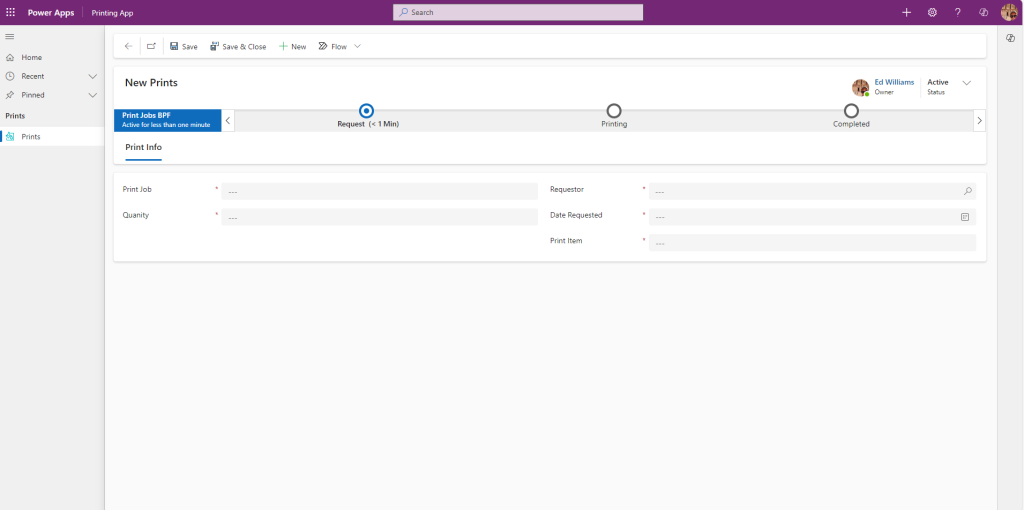
The example will be that of a somebody who manages a 3D Printing business (I love 3D printing) via Dataverse and Model Driven apps. The co pilot will allow the user to get the status of a print job from the database and update its associated BPF.
Initial Configuration
Dataverse Table
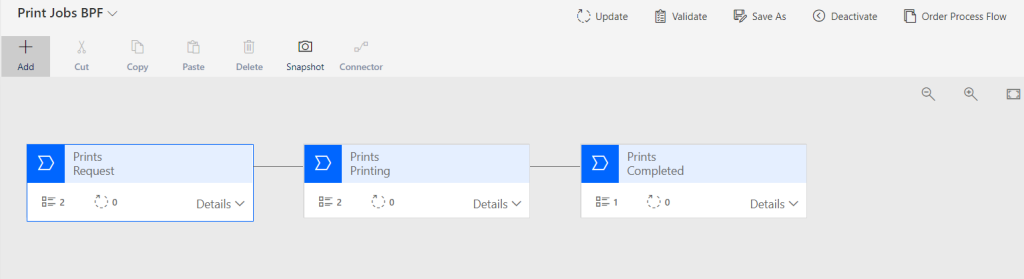
BPF
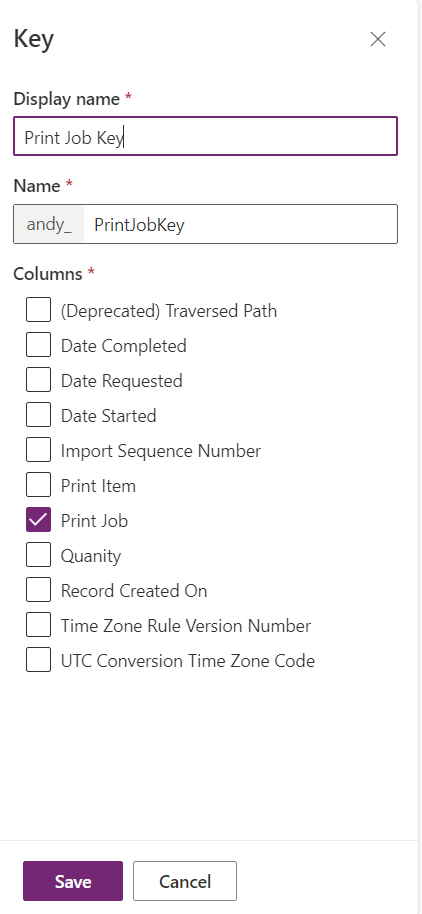
Keys
Create a key for the print job column to ensure no names are unique
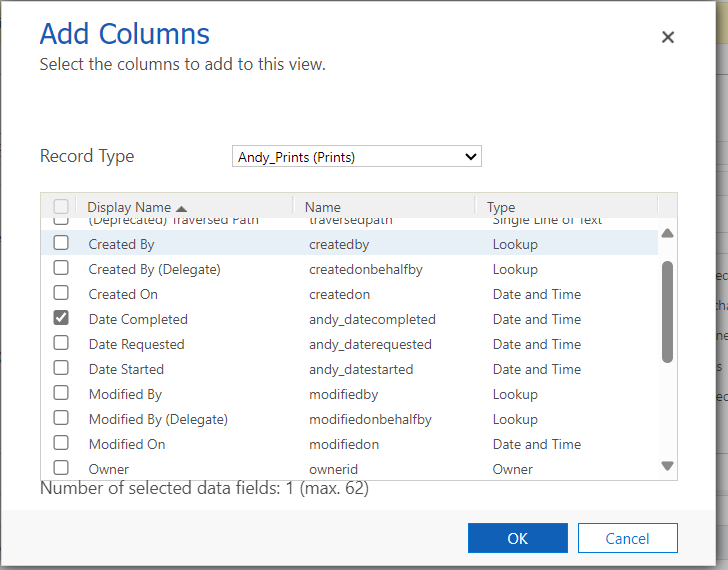
Views
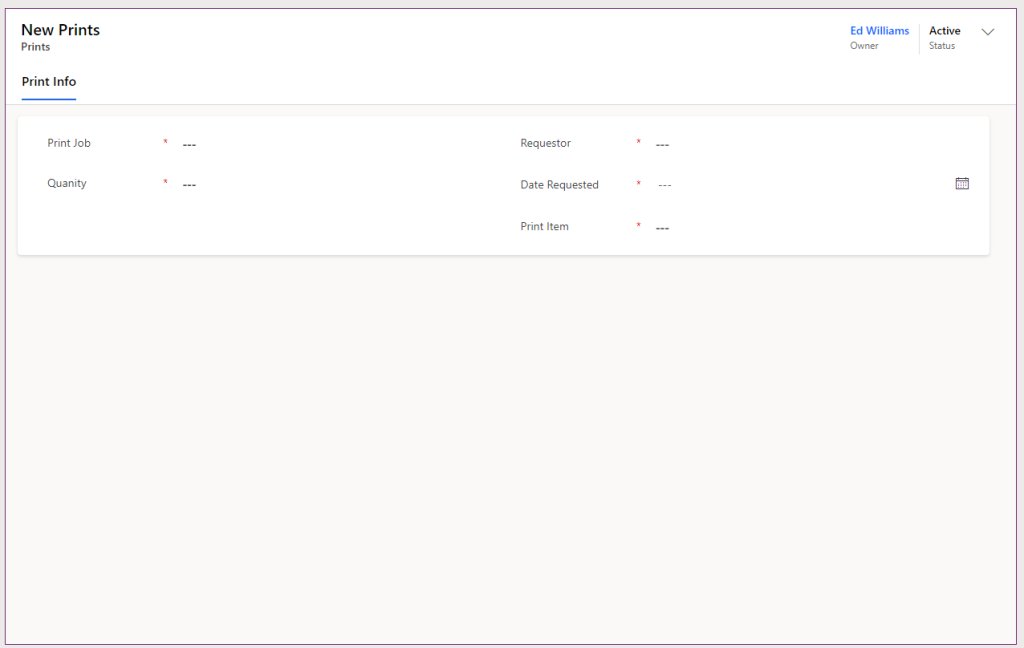
Form
App
Classic Workflows
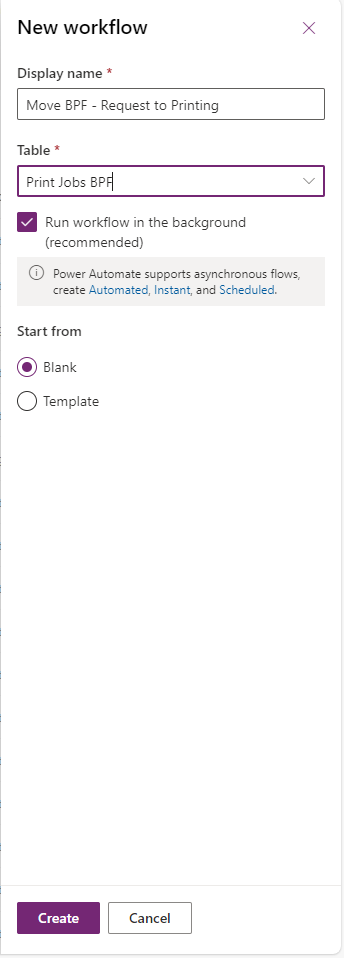
I use classic workflows when I manage BPF automatically moving between stages. It can be done with Power Automate, but I find this much easier.
Move BPF from Request to Printing
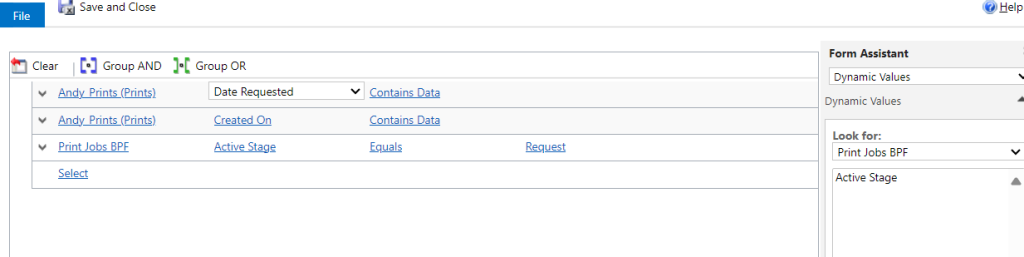
- Create a new Classic workflow that is attached to the BPF table
- Set the conditions to be the based on the related table (Prints), then set the date requested and created on to contains data. Also, set the Active stage to equals Request
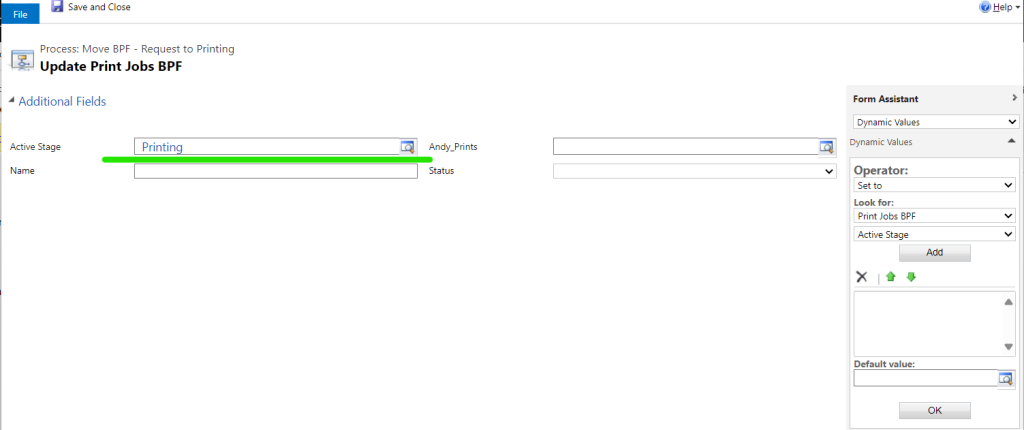
- Add an Update step for the BPF table, then select “Set Properties”

- Set the Active Stage to Printing
- Then convert the workflow to a real time workflow
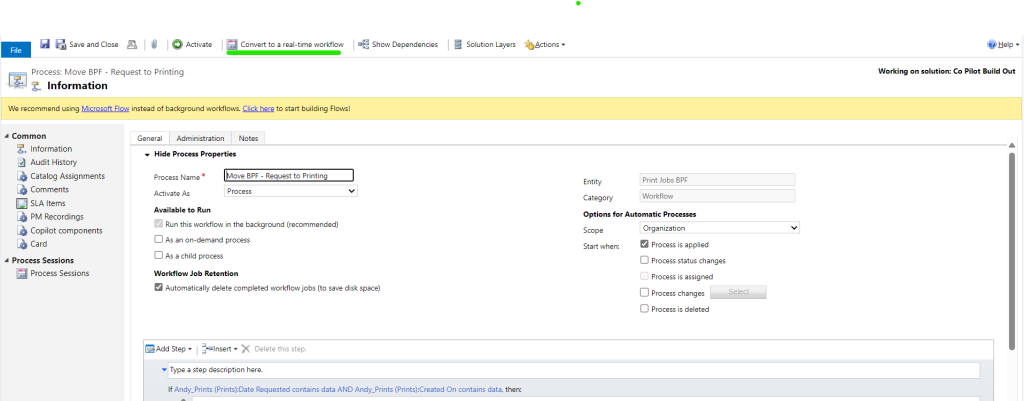
- Save and Activate the Workflow
With the workflow in place, the BPF will move forward shortly after the record is created.
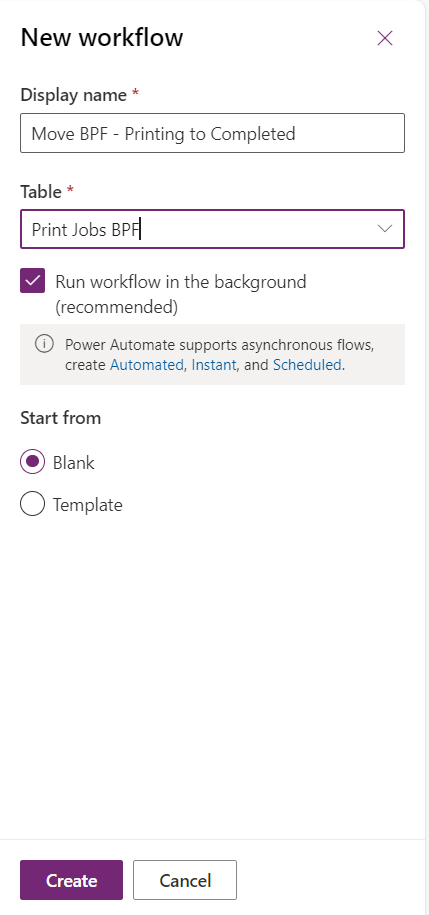
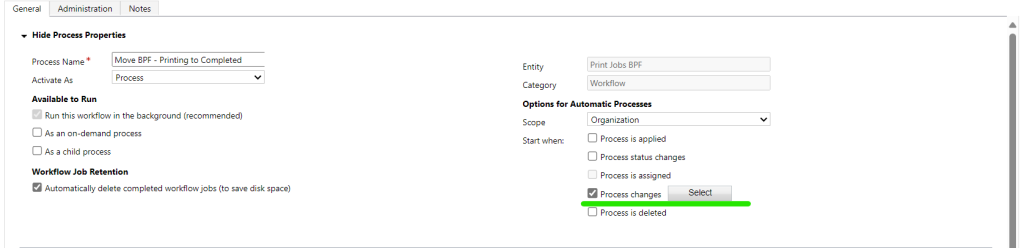
Move BPF from Printing to Completed
- As with the step before, create a new workflow background workflow
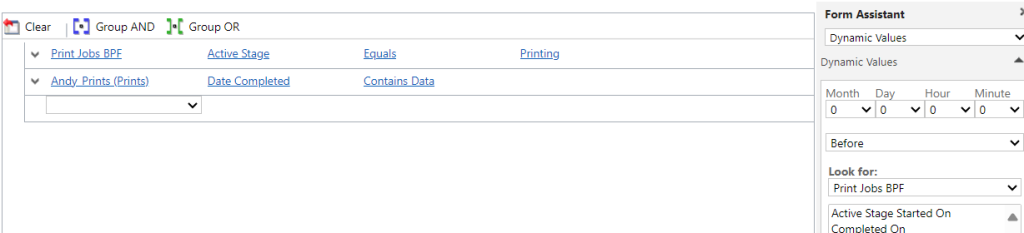
- Set the condition to be the same as the BPF stage itself and the active stage to Printing
- App an update step to put the BPF in the completed Stage status to Inactive
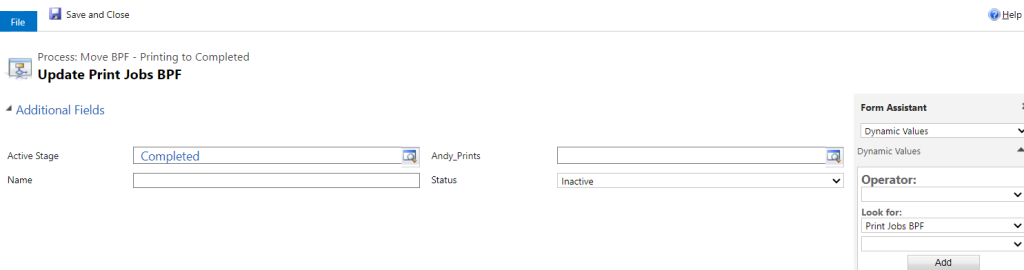
- Then, add another update stage that updates the Prints table Status column to Inactive
- Update the Starts when to Process changes
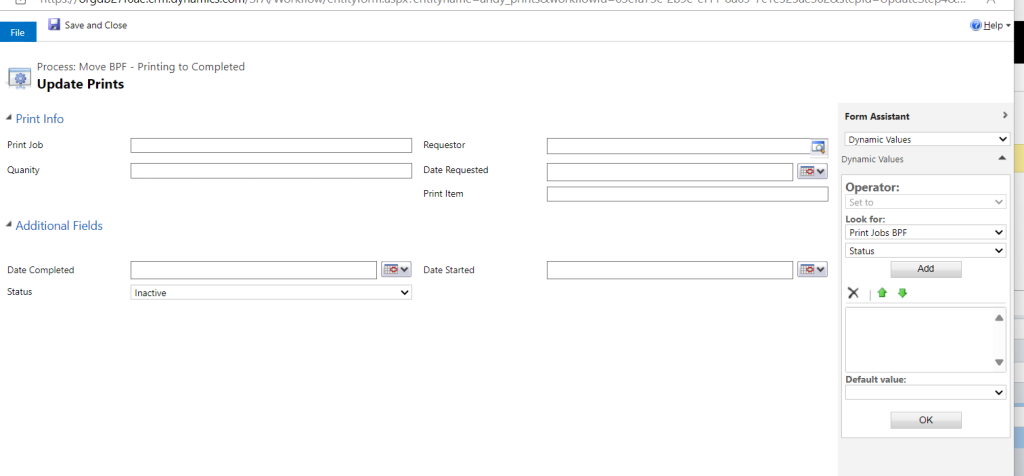
- Using the Prints table, set the Update if Date Completed
- Save and Active the workflow
Copilot Studio
Setup
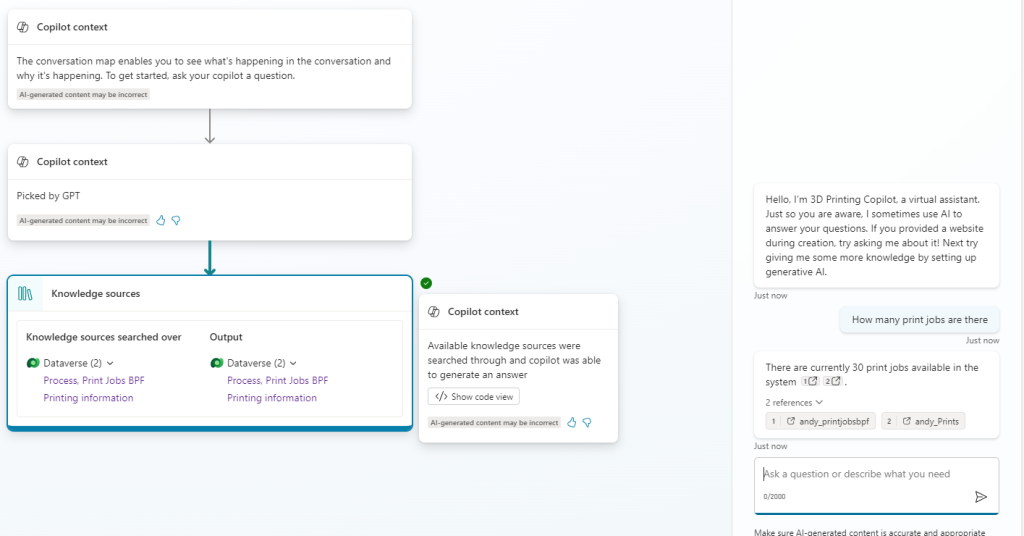
When building out this Copilot, I tried using straight generative AI with knowledge, Topics connected to flows, and actions connected with flows. I wanted the ability for a user to query a job, get the BPF stage and its steps, then update it. I landed on using topics with power automate flows and generative AI enabled.
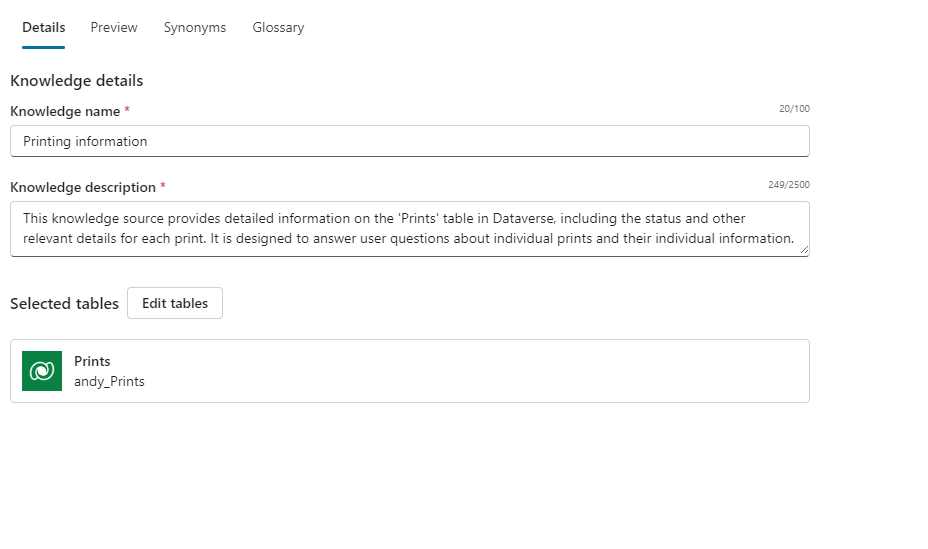
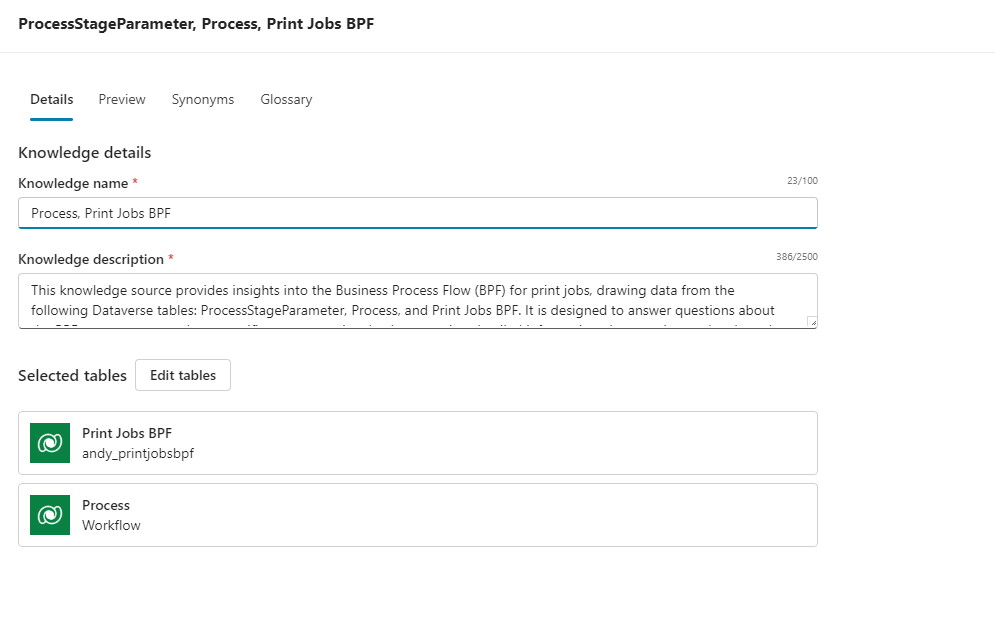
Knowledge
I built out two knowledge sources, one for just the prints table and one for the BPF table and its associated tables.

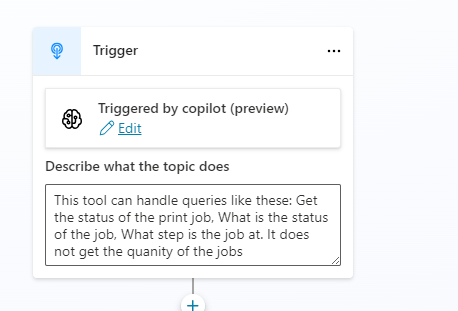
Topic 1 - Get BPF info
The first topic will reach out to the Prints table, gets associated BPF record, and give the information back to the user.
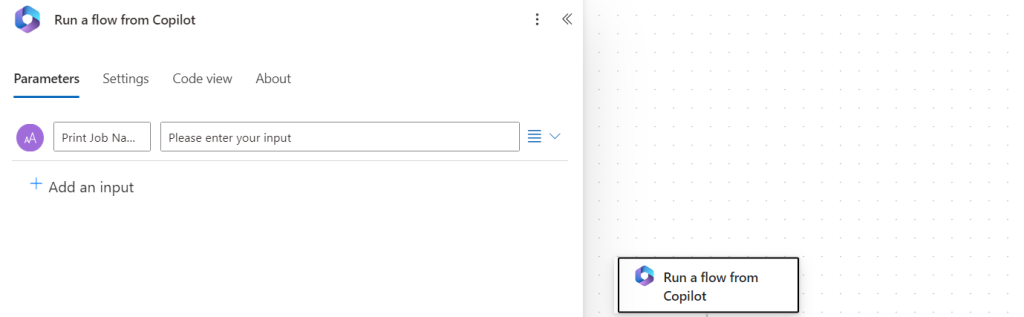
- The trigger will be from copilot
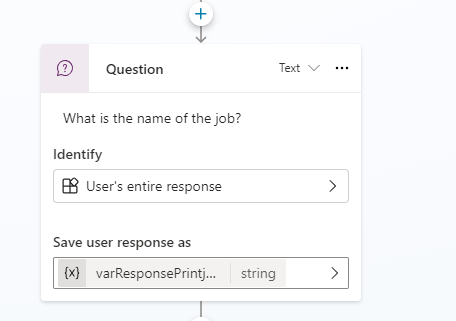
- The user is then asked for the name of the print job. The output is saved in variable “varResponsePrintjobname”
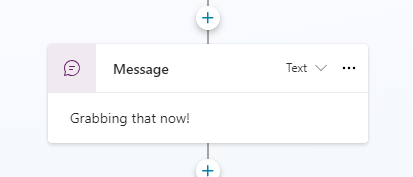
- A message is sent to the user letting them know the action is running
- A Power Automate flow is then executed. I will show how to build this next.
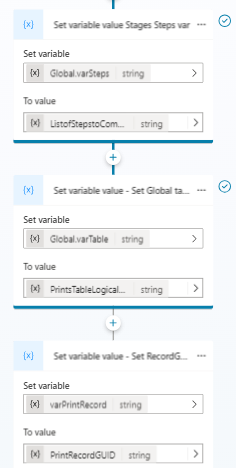
- Three global variables are set from the output of the flows. I chose to do this instead of saving the topic variable as global because I find responses in the chat are “better” if they are Topic only.
Power Automate flow - Get BPF Information for Copilot
- Create a Power Automate workflow called Get BPF Information for Copilot with a Copilot trigger.
- Add a text input called Print Job Name
- Add four variables, two string variables, and two array variables
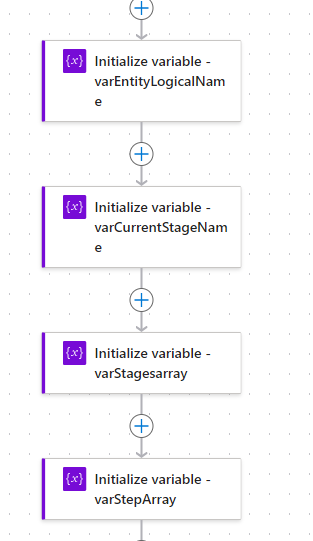
- varEntityLogicalName - String
- varCurrentStageName - String
- varStagesArray - Array
- varStepArray - Array
- Using a List Rows filter, the table using FetchXML ( I find it easier)
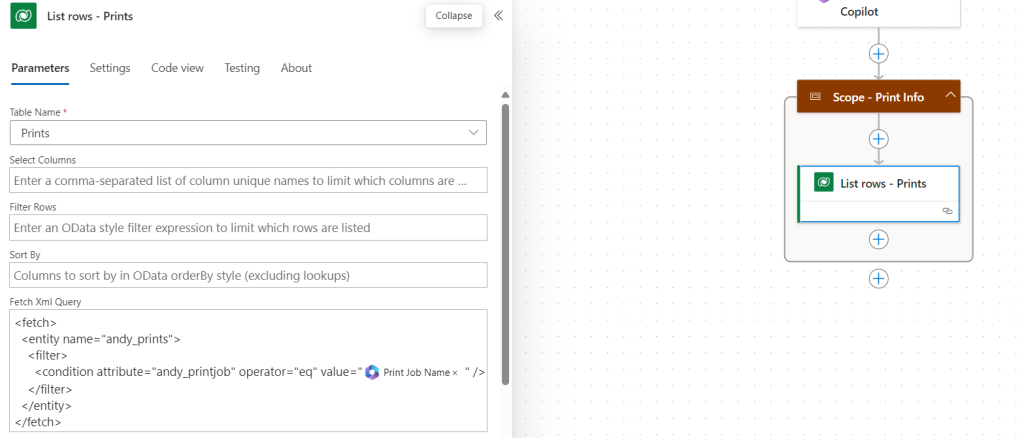
<fetch> <entity name="andy_prints"> <filter> <condition attribute="andy_printjob" operator="eq" value="" /> </filter> </entity> </fetch> - Using another list rows, do a FetchXML to find the BPF row based on the associated Print row
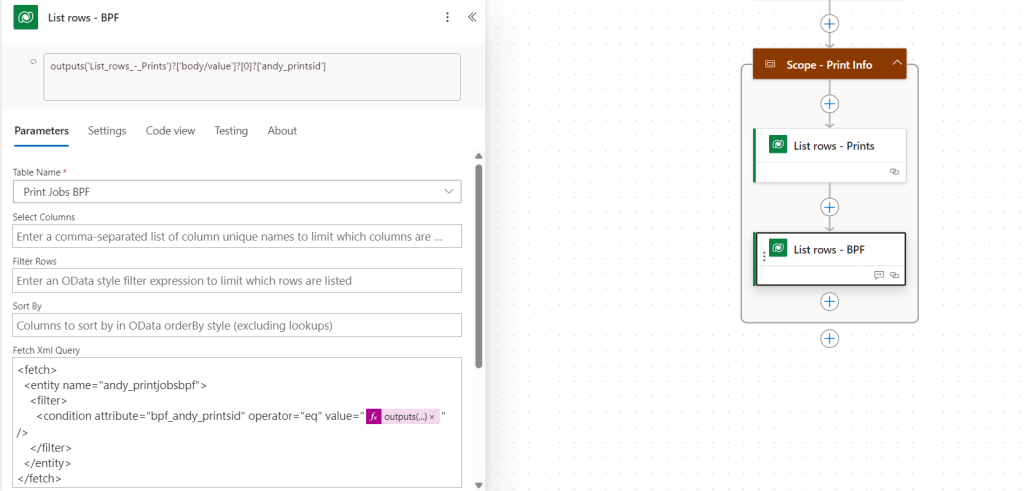
outputs('List_rows_-_Prints')?['body/value']?[0]?['andy_printsid']💡 The next part should be built out as a child flow for production purposes so it can be reused. But for this demo i put it all into one flow
- Create vars
- Create another Scope called “Scope - Process Stage”
- Within the Scope there will be two actions
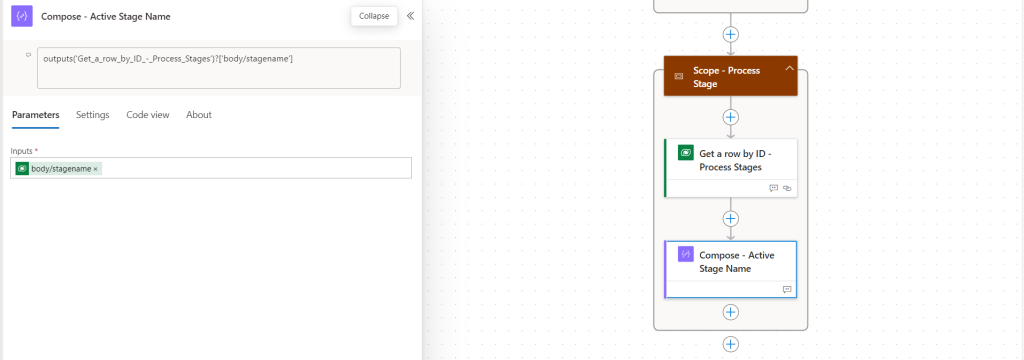
- The First Action “Get a row by ID - Process Stages”, will use the outputs of the List rows - BPF to get the process stages of the BPF
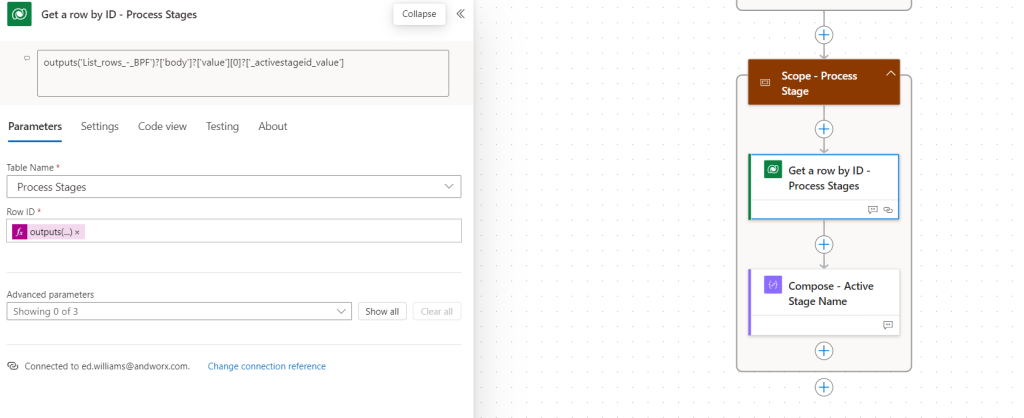
outputs('List_rows_-_BPF')?['body']?['value'][0]?['_activestageid_value'] - The second will compose the active stage display name
💡 This is where the complications of BPF stages and steps come into play. To get the steps of a BPF we need to parse the workflows table and get the clientdata of the row. This is a JSON stored as a string. It is comprised of StageSteps (BPF Stages) and StepSteps (the BPF data steps). We need this information so that we can send it back to copilot and inform the user what stage its at and the steps that need to be taken to update it.
- Next, add parallel Dataverse action to get the the workflow information
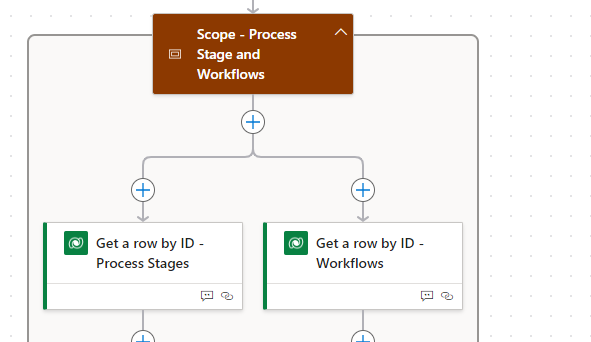
- Add a Dataverse, get row by ID, and use the process ID gathered above
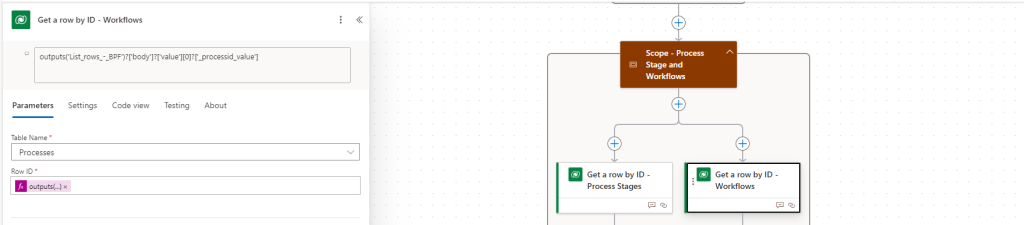
outputs('List_rows_-_BPF')?['body']?['value'][0]?['_processid_value'] - Nex,t will be a ParseJSON of the outputs clientdata
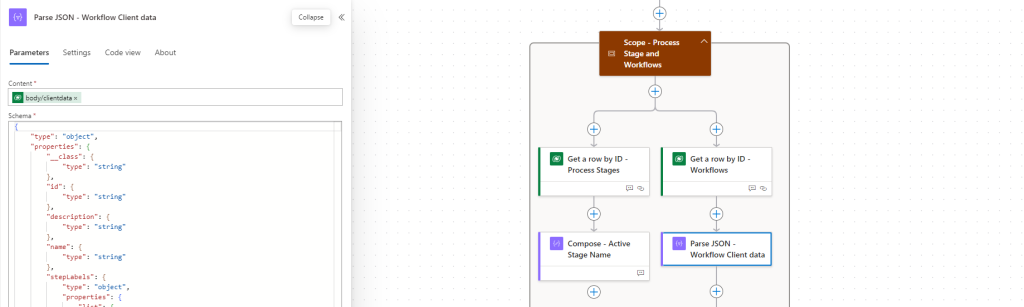
{ "type": "object", "properties": { "__class": { "type": "string" }, "id": { "type": "string" }, "description": { "type": "string" }, "name": { "type": "string" }, "stepLabels": { "type": "object", "properties": { "list": { "type": "array" } } }, "steps": { "type": "object", "properties": { "list": { "type": "array", "items": { "type": "object", "properties": { "__class": { "type": "string" }, "id": { "type": "string" }, "description": { "type": "string" }, "name": { "type": "string" }, "stepLabels": { "type": "object", "properties": { "list": { "type": "array" } } }, "steps": { "type": "object", "properties": { "list": { "type": "array" } } }, "relationshipName": {}, "attributeName": {}, "isClosedLoop": { "type": "boolean" } }, "required": [ "__class", "id", "description", "name", "stepLabels", "steps" ] } } } }, "primaryEntityName": { "type": "string" }, "nextStepIndex": { "type": "string" }, "isCrmUIWorkflow": { "type": "boolean" }, "category": { "type": "string" }, "businessProcessType": { "type": "string" }, "mode": { "type": "string" }, "title": { "type": "string" }, "workflowEntityId": { "type": "string" }, "formId": {}, "argumentsArray": { "type": "array" }, "variables": { "type": "array" }, "inputs": { "type": "array" } } } - A filter array is used to filter the clientdata so only the steps are given and no other parts of the data. To do this, we need to convert the list data into an array then filter it
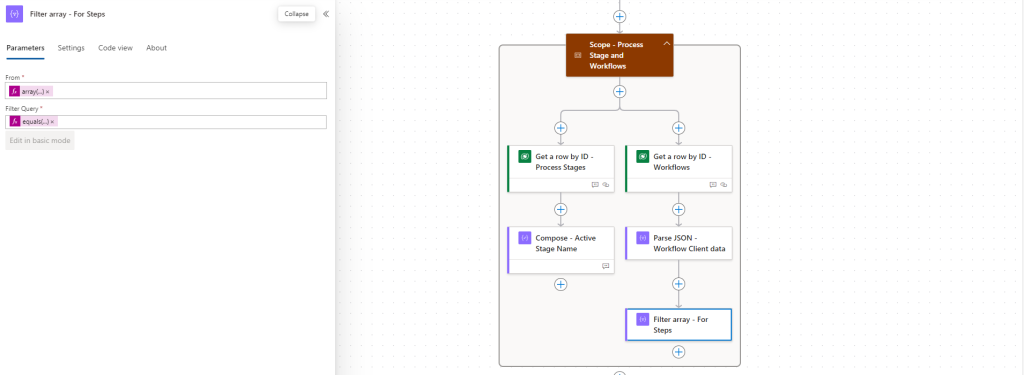
array(body('Parse_JSON_-_Workflow_Client_data')?['steps']?['list'])equals(item()?['__class'], 'EntityStep:#Microsoft.Crm.Workflow.ObjectModel') - Then, we can set the Entity logical name
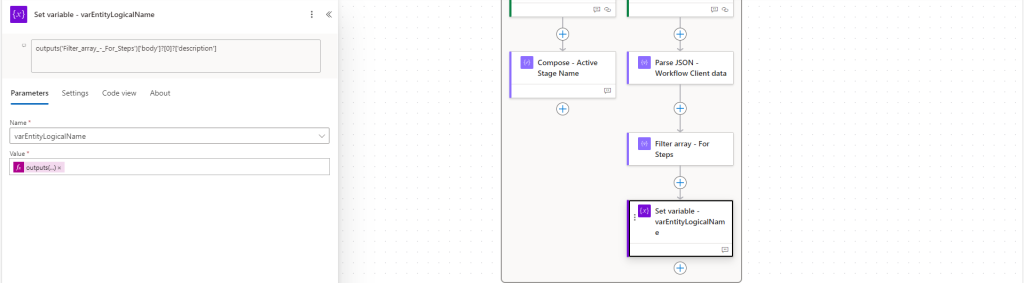
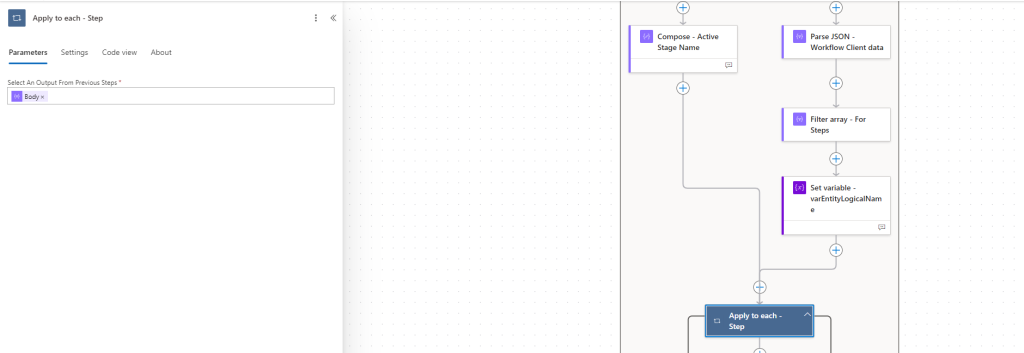
outputs('Filter_array_-_For_Steps')['body']?[0]?['description'] - To get the steps within the array, we now add an apply to each and use the body of the filter array - for steps
- Configure the Apply to each to run after the setting of the variable and the compose of the stage name. The Apply to each will loop over each item from the Filter array - For Steps
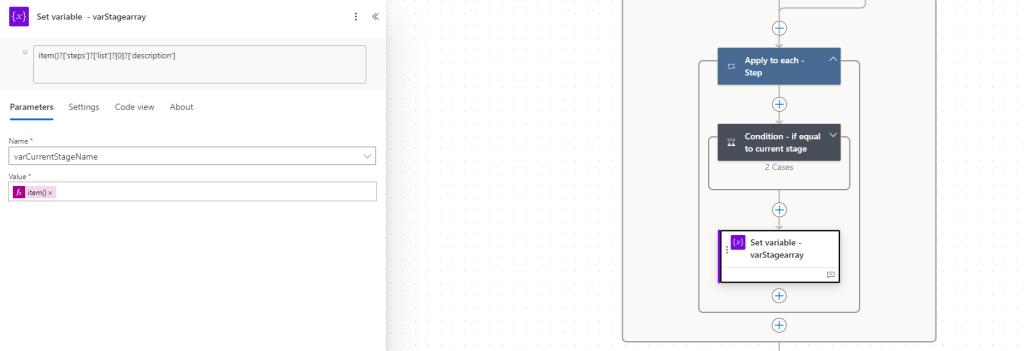
- Add an append to array variable that will add the stage and the steps to the variable - varStagearray
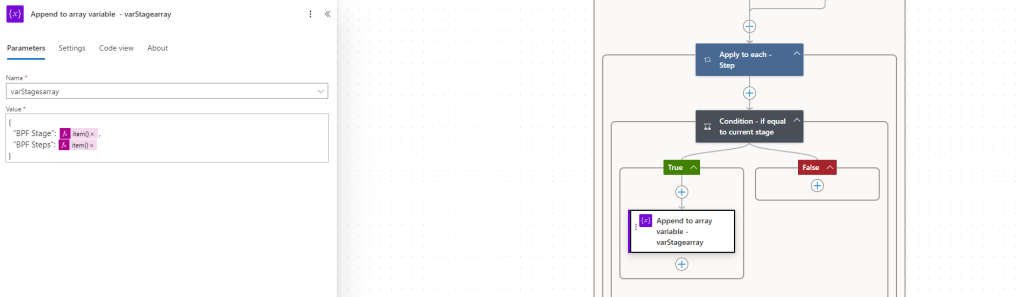
item()?['steps']?['list']?[0]?['description']item()?['steps']?['list']?[0]?['steps']?['list'] - With an array of the stages and steps, we now clean the steps so we can send a “clean” list to Copilot Studio to show the user the exact stage and steps. To do this, we will do another For Each loop within the true leg of the condition.
- Before we can do the loop though, add in a parse JSON to access the array a bit easier, then add the loop and another append to array variable.
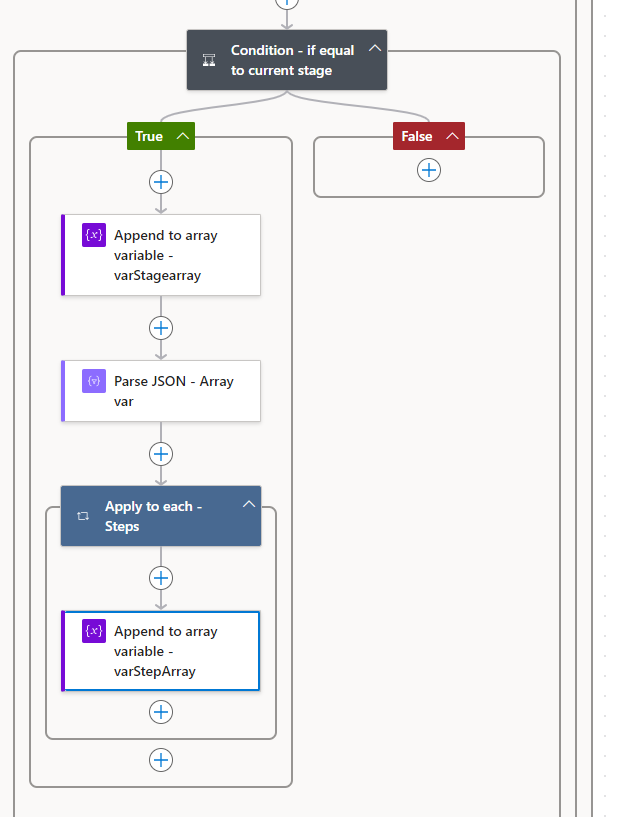
- Set the variable varCurrentStageName with the current stage name
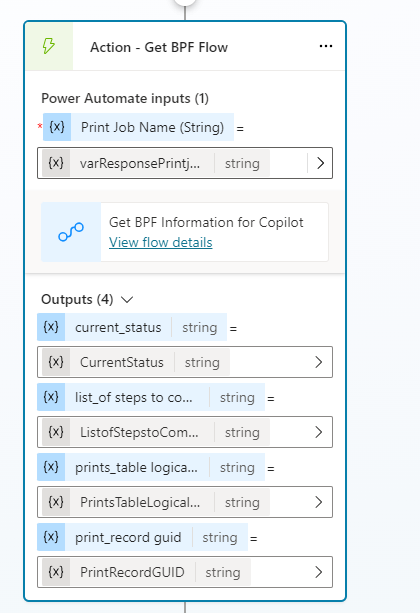
- The last step of the flow is to respond to the Copilot with the current Stage/Step/Current table/RecordGUID
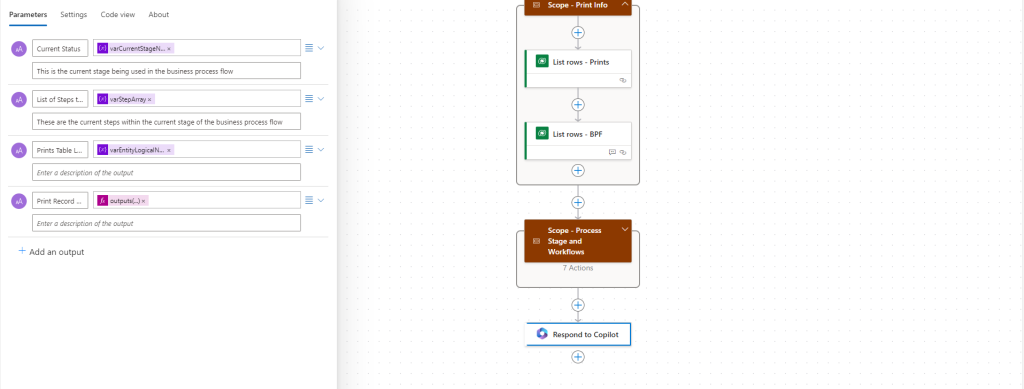
💡 It is important to give the responses to Copilot good names along with good descriptions
{
  "type": "Response",
  "kind": "Skills",
  "inputs": {
    "schema": {
      "type": "object",
      "properties": {
        "current_status": {
          "title": "Current Status",
          "description": "This is the current stage being used in the business process flow",
          "type": "string",
          "x-ms-content-hint": "TEXT",
          "x-ms-dynamically-added": true
        },
        "list_of steps to complete": {
          "title": "List of Steps to Complete",
          "description": "These are the current steps within the current stage of the business process flow",
          "type": "string",
          "x-ms-content-hint": "TEXT",
          "x-ms-dynamically-added": true
        },
        "prints_table logical name": {
          "title": "Prints Table Logical Name",
          "description": "",
          "type": "string",
          "x-ms-content-hint": "TEXT",
          "x-ms-dynamically-added": true
        },
        "print_record guid": {
          "title": "Print Record GUID",
          "description": "",
          "type": "string",
          "x-ms-content-hint": "TEXT",
          "x-ms-dynamically-added": true
        }
      },
      "additionalProperties": {}
    },
    "statusCode": 200,
    "body": {
      "current_status": "@{variables('varCurrentStageName')}",
      "list_of steps to complete": "@{variables('varStepArray')}",
      "prints_table logical name": "@{variables('varEntityLogicalName')}",
      "print_record guid": "@{outputs('List_rows_-_Prints')?['body/value']?[0]?['andy_printsid']}"
    }
  },
  "runAfter": {
    "Scope_-_Process_Stage_and_Workflows": [
      "Succeeded"
    ]
  }
}
Testing
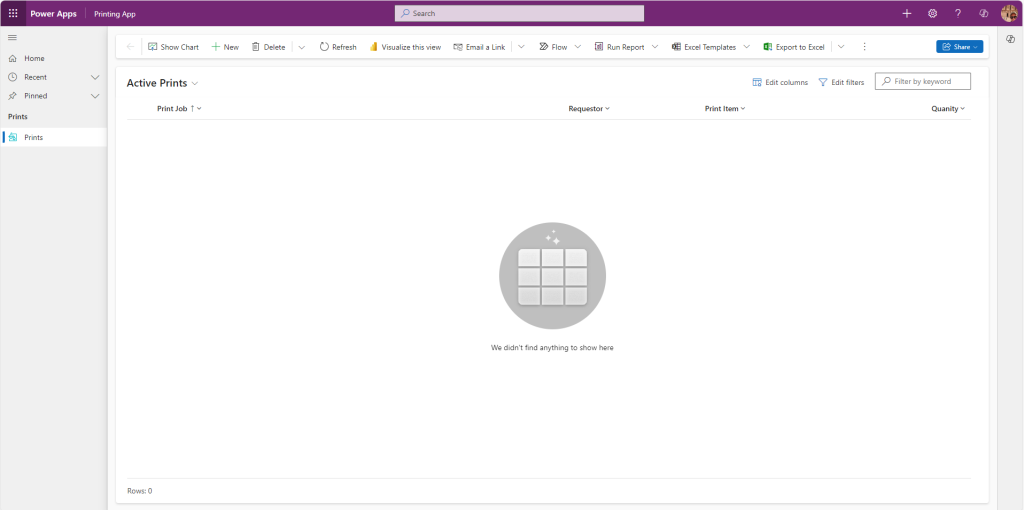
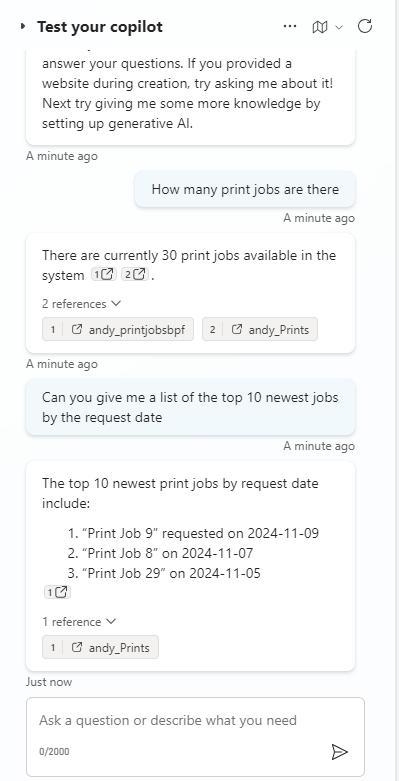
To test the co pilot, I have added 30 records
| Print Job | Requestor | Print Item | Quanity |
| Print Job 1 | Jim Henson | Kermit the Frog | 3 |
| Print Job 10 | Jim Henson | Dr. Bunsen Honeydew | 25 |
| Print Job 11 | Jim Henson | Beaker | 60 |
| Print Job 12 | Jim Henson | Scooter | 13 |
| Print Job 13 | Jim Henson | Rizzo the Rat | 70 |
| Print Job 14 | Jim Henson | Sam Eagle | 2 |
| Print Job 15 | Jim Henson | Sweetums | 45 |
| Print Job 16 | Jim Henson | Dr. Teeth | 27 |
| Print Job 17 | Jim Henson | Floyd Pepper | 39 |
| Print Job 18 | Jim Henson | Janice | 9 |
| Print Job 19 | Jim Henson | Zoot | 50 |
| Print Job 2 | Jim Henson | Miss Piggy | 15 |
| Print Job 20 | Jim Henson | Camilla the Chicken | 6 |
| Print Job 21 | Jim Henson | Robin the Frog | 73 |
| Print Job 22 | Jim Henson | Crazy Harry | 30 |
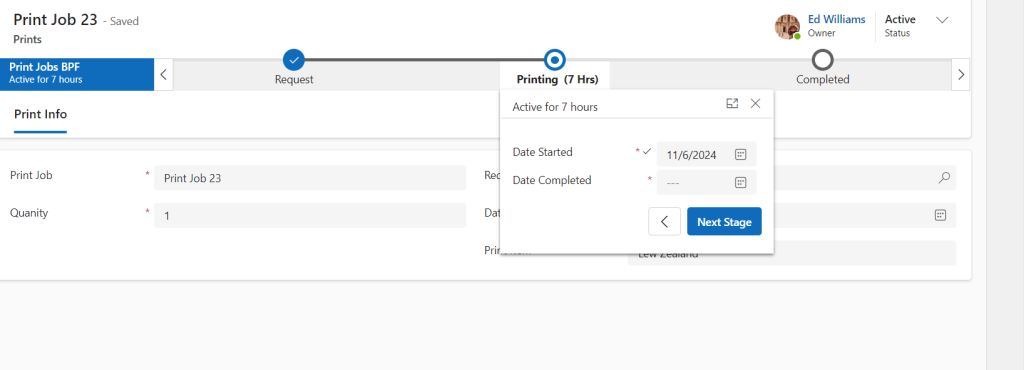
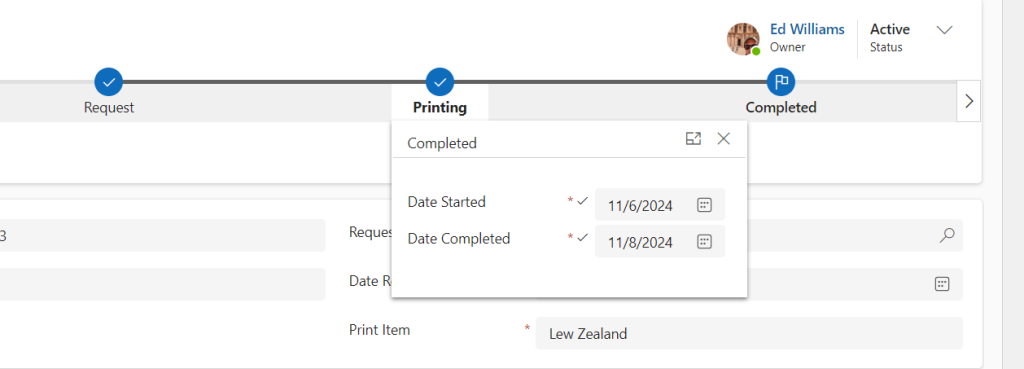
| Print Job 23 | Jim Henson | Lew Zealand | 1 |
| Print Job 24 | Jim Henson | Mahna Mahna | 12 |
| Print Job 25 | Jim Henson | Pepe the King Prawn | 42 |
| Print Job 26 | Jim Henson | Beauregard | 18 |
| Print Job 27 | Jim Henson | Clifford | 58 |
| Print Job 28 | Jim Henson | Link Hogthrob | 14 |
| Print Job 29 | Jim Henson | Marvin Suggs | 67 |
| Print Job 3 | Jim Henson | Fozzie Bear | 22 |
| Print Job 30 | Jim Henson | Uncle Deadly | 31 |
| Print Job 4 | Jim Henson | Gonzo the Great | 5 |
| Print Job 5 | Jim Henson | Animal | 48 |
| Print Job 6 | Jim Henson | Rowlf the Dog | 7 |
| Print Job 7 | Jim Henson | Statler | 34 |
| Print Job 8 | Jim Henson | Waldorf | 69 |
| Print Job 9 | Jim Henson | The Swedish Chef | 11 |
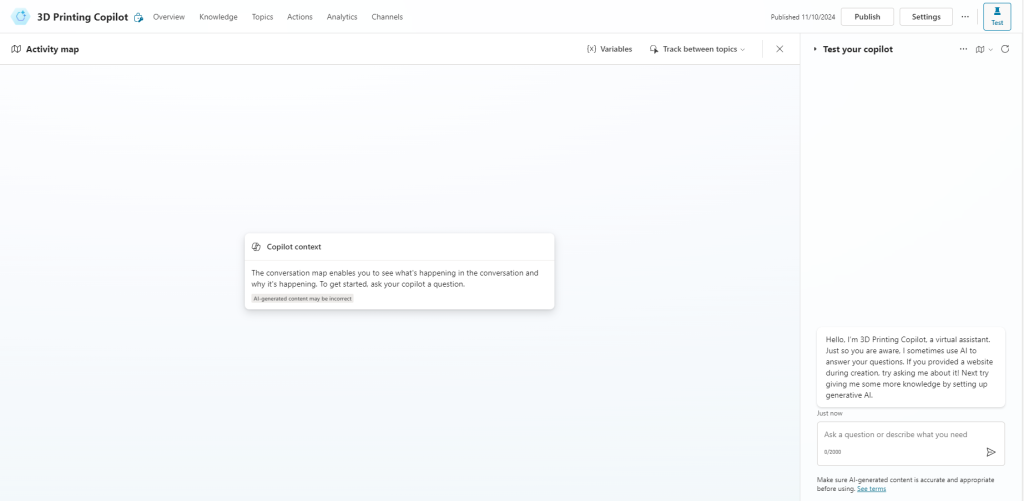
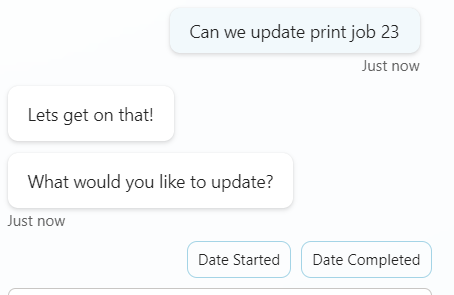
With just this data and the current topic on here is my test, ask how many jobs there are, get some basic info on a job, then get the BPF status
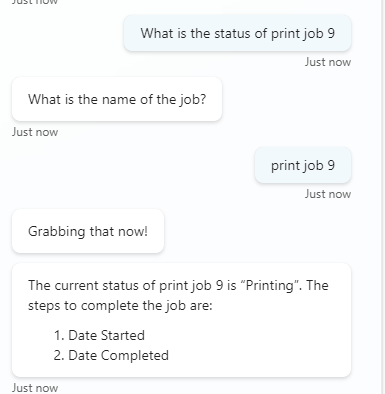
We now have a good extraction of the stage and steps. The next step will be to allow the user to update the BPF via copilot.
Topic 2 - Get Column Info
Topic flow - Part 1
With the columns returned, we now need to get the types when then user asks to update the record. This could have been done during the last flow, but for the sake of speed, I decided to run it after a user asks for it.
- Create a trigger and a message for the user. The trigger will be called if the user asks to update the record. The message will let the user know its working.
- Run a Power Automate flow that will give us the column types out put (the guide for the flow is next)
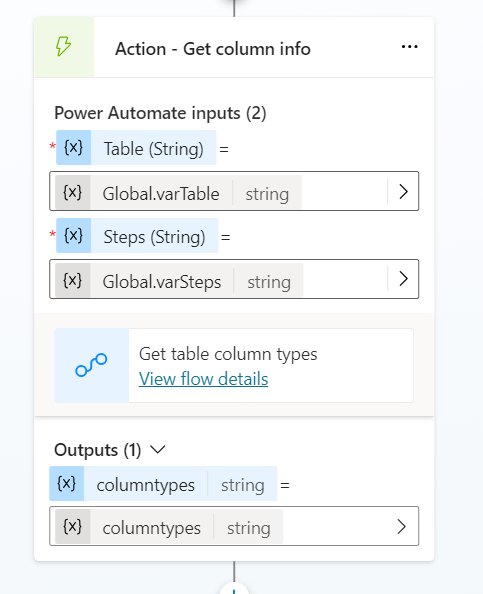
Power Automate flow - Get Column info from Copilot
This next flow will get the column information that was gathered from the previous flow. This is important because we don't just want to get the information into the bot, we want to write updates back to the BPF.
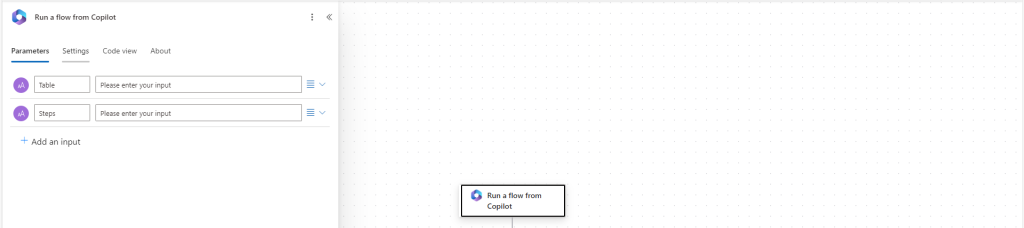
- The trigger will be a run from copilot with two text inputs, Table and steps
- The next step is to do a Parse JSON of the steps then to initialize a new variable array called vatTypes
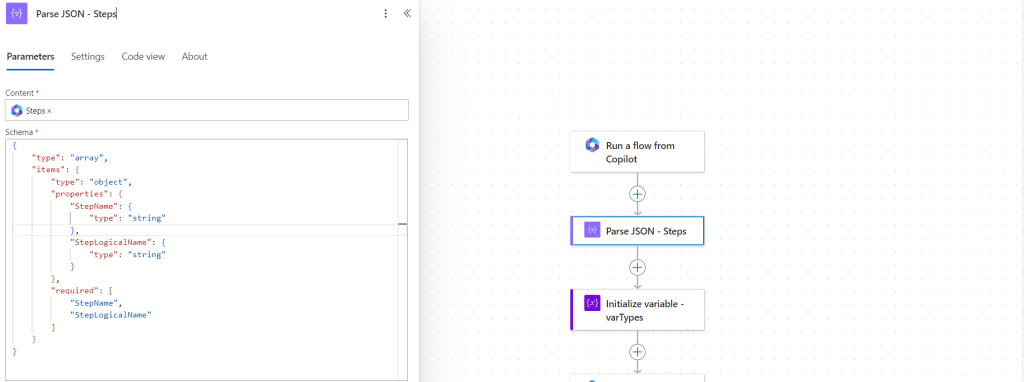
{ "type": "array", "items": { "type": "object", "properties": { "StepName": { "type": "string" }, "StepLogicalName": { "type": "string" } }, "required": [ "StepName", "StepLogicalName" ] } } - To get the column type we need to run an HTTP request to Dataverse that will sit in a for each loop of the steps, I like to use the HTTP with Microsoft Entra ID (preauthorized)

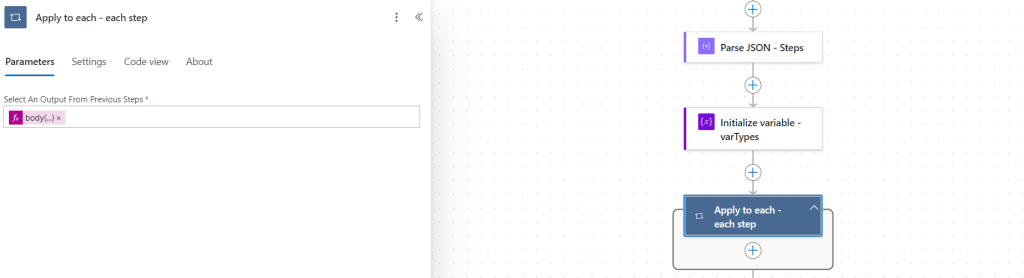
body('Parse_JSON_-_Steps')?[0]?['stepList']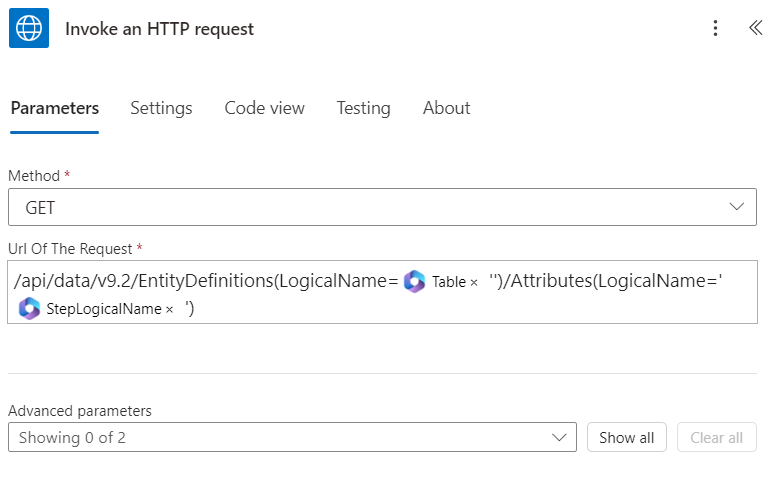
/api/data/v9.2/EntityDefinitions(LogicalName='@{triggerBody()?['text']}')/Attributes(LogicalName='@{items('Apply_to_each_-_each_step')['StepLogicalName']}') - Add an append to array action that add the following
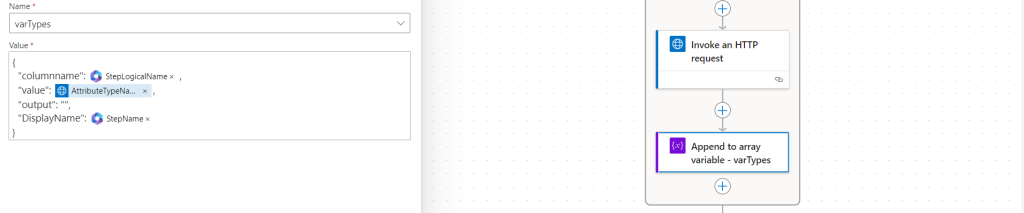
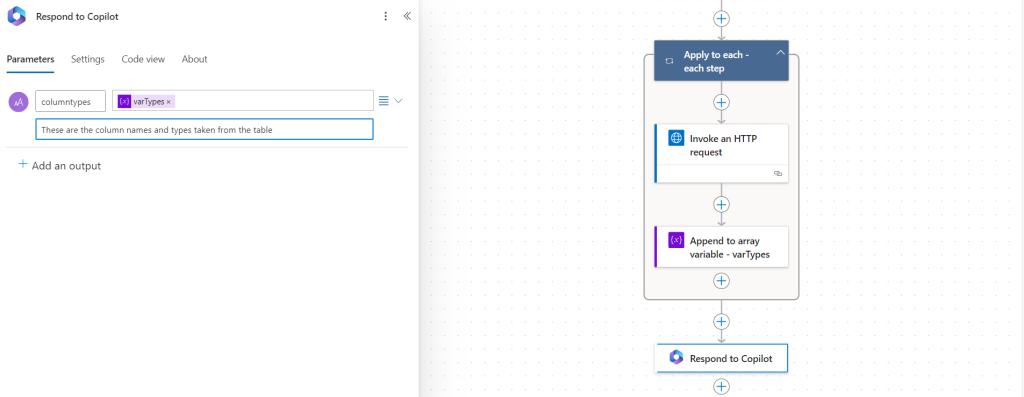
{ "columnname": @{items('Apply_to_each_-_each_step')?['StepLogicalName']}, "value": @{body('Invoke_an_HTTP_request')?['AttributeTypeName']?['Value']}, "output": "", "DisplayName": @{items('Apply_to_each_-_each_step')?['StepName']} } - Within the respond to Copilot add the varTypes to the columntypes output
Topic flow - Part 2
- Parse the variable to save it as a table
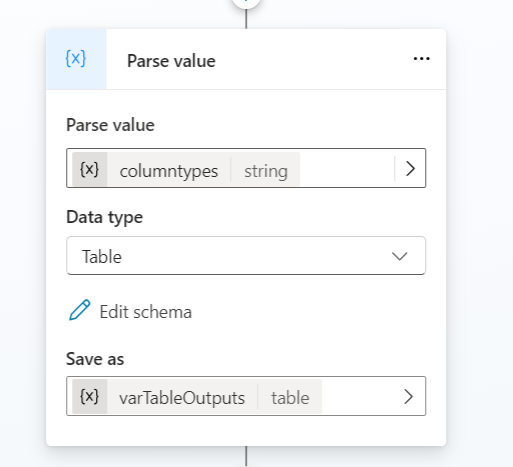
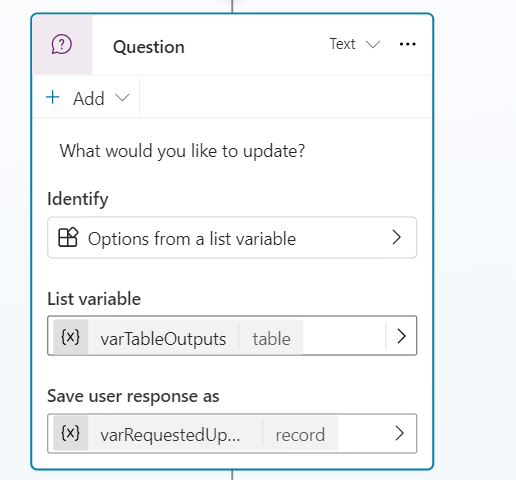
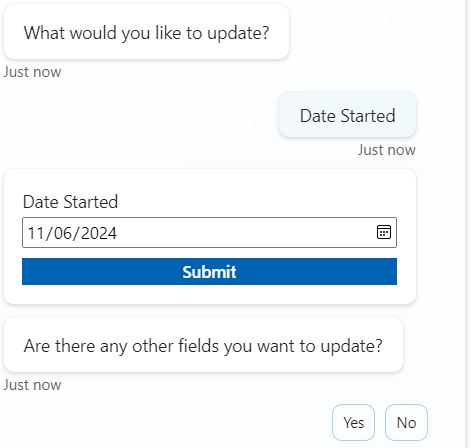
kind: Table properties: columnname: String DisplayName: String output: String value: String - Then post a question to the user on the type of column to be updated
Testing
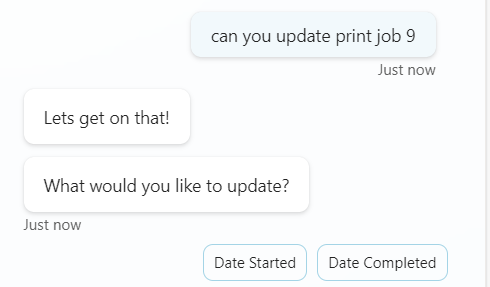
With that we can now get a list of options to update in the chat
Topic flow - Part 3 Update record
With all this information, we can now run a flow to update the record. However, since we do not know the table, or the column name, nor the column type until the user request it from the chat, we need to make a dynamic update process.
There are a total of 28 data verse column types Column data types in Microsoft Dataverse - Power Apps | Microsoft Learn
| Name | Type | Data |
|---|---|---|
| Big | Time Stamp | BigIntType |
| Choice | Option Set | PicklistType |
| Choices | MultiSelect Field | MultiSelectPicklistType |
| Currency | Currency | MoneyType |
| Customer | Customer | CustomerType |
| Date and Time | Date and Time Date and Time Format | DateTimeType |
| Date Only | Date and Time Date Only Format | DateTimeType |
| Decimal Number | Decimal Number | DecimalType |
| Duration | Whole Number Duration Format | IntegerType |
| Single Line of Text Email Format | StringType | |
| File | File | FileType |
| Floating Point Number | Floating Point Number | DoubleType |
| Image | Image | ImageType |
| Language | Whole Number Language Format | IntegerType |
| Lookup | Lookup | LookupType |
| Multiline Text | Multiple Lines of Text | MemoType |
| Owner | Owner | OwnerType |
| Phone | Single Line of Text Phone Format | StringType |
| Status | Status | StateType |
| Status Reason | Status Reason | StatusType |
| Text | Single Line of Text Text Format | StringType |
| Text Area | Single Line of Text Text Area Format | StringType |
| Ticker Symbol | Single Line of Text Ticker Symbol Format | StringType |
| Timezone | Whole Number Time Zone Format | IntegerType |
| Unique Identifier | Unique Identifier or Primary Key | UniqueidentifierType |
| URL | Single Line of Text URL Format | StringType |
| Whole Number | Whole Number None Format | IntegerType |
| Yes/No | Two Options | BooleanType |
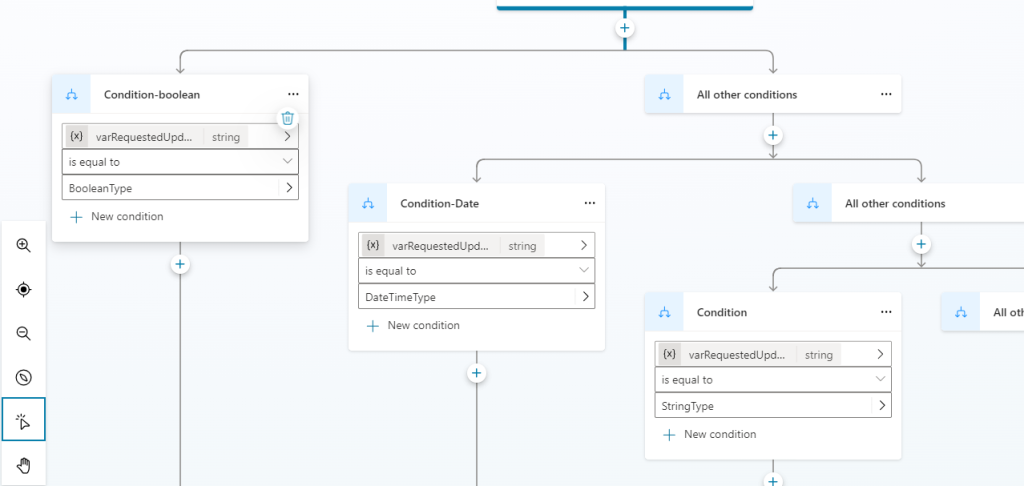
With this information, we can build a set of flows that will update the appropriate data type. For the example I will build out three types, Date/String/Boolean.
- Add three conditions to handle the data types
- Under the Boolean condition add a ask with adaptive card action
{ "type": "AdaptiveCard", "$schema": "http://adaptivecards.io/schemas/adaptive-card.json", "version": "1.5", "body": [ { "type": "Container", "items": [ { "type": "Input.Toggle", "title": "TITLE", "id": "varRequestupdateboolean" } ] }, { "type": "ActionSet", "actions": [ { "type": "Action.Submit", "title": "Submit", "style": "positive", "id": "SubmitOutput" } ] } ] } - Since this is Copilot studio, we can update the card to be dynamic with Power FX. So that the title is the display name of the column
{ type: "AdaptiveCard", '$schema': "http://adaptivecards.io/schemas/adaptive-card.json", version: "1.5", body: [ { type: "Container", items: [ { type: "Input.Toggle", title: Topic.varRequestedUpdate.DisplayName, id: "varRequestupdateboolean" } ] }, { type: "ActionSet", actions: [ { type: "Action.Submit", title: "Submit", style: "positive", id: "SubmitOutput" } ] } ] } - For the Date add this adaptive card
{ "type": "AdaptiveCard", "$schema": "http://adaptivecards.io/schemas/adaptive-card.json", "version": "1.5", "body": [ { "type": "Container", "items": [ { "type": "Input.Date", "id": "varRequestupdatedate", "label": "Title" } ] }, { "type": "ActionSet", "actions": [ { "type": "Action.Submit", "title": "Submit", "style": "positive", "id": "SubmitOutput" } ] } ] } - Then update the card to use the following Power FX
{ type: "AdaptiveCard", '$schema': "http://adaptivecards.io/schemas/adaptive-card.json", version: "1.5", body: [ { type: "Container", items: [ { type: "Input.Date", id: "varRequestupdatedate", label: Topic.varRequestedUpdate.DisplayName } ] }, { type: "ActionSet", actions: [ { type: "Action.Submit", title: "Submit", style: "positive", id: "SubmitOutput" } ] } ] } - For the string type use this card
{ "type": "AdaptiveCard", "$schema": "http://adaptivecards.io/schemas/adaptive-card.json", "version": "1.5", "body": [ { "type": "Container", "items": [ { "type": "Input.Text", "placeholder": "Placeholder text", "id": "varRequestupdatestring", "label": "TITLE" } ] }, { "type": "ActionSet", "actions": [ { "type": "Action.Submit", "title": "Submit", "style": "positive", "id": "SubmitOutput" } ] } ] } - Then update it with the following PowerFX
{ type: "AdaptiveCard", '$schema': "http://adaptivecards.io/schemas/adaptive-card.json", version: "1.5", body: [ { type: "Container", items: [ { type: "Input.Text", placeholder: "", id: "varRequestupdatestring", label: Topic.varRequestedUpdate.DisplayName } ] }, { type: "ActionSet", actions: [ { type: "Action.Submit", title: "Submit", style: "positive", id: "SubmitOutput" } ] } ] } - With the cards created we can now run the flows. There will be a flow per each condition. For the example given here, I will show how to build the date update flow. I am going to do another post on how to handle each column type later.
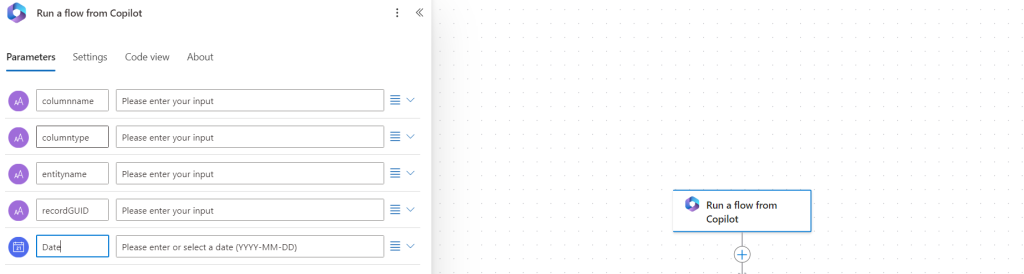
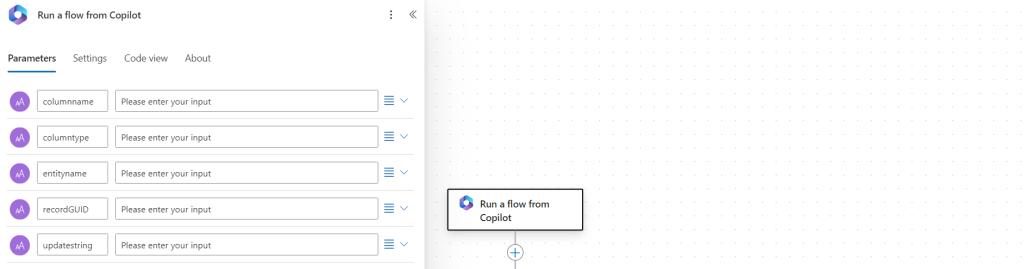
Power Automate - Update DateTime Flow
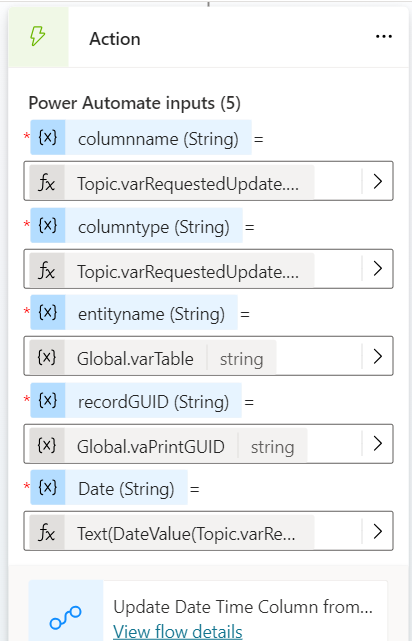
- Create a flow with four text inputs and one date input
- The two HTTP requests will be added. The first will be used to get the entity set name and the second will be used to preform the update
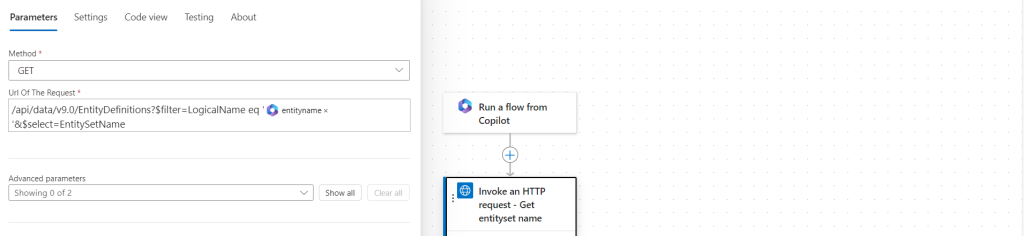
/api/data/v9.0/EntityDefinitions?$filter=LogicalName eq '@{triggerBody()?['text_2']}'&$select=EntitySetName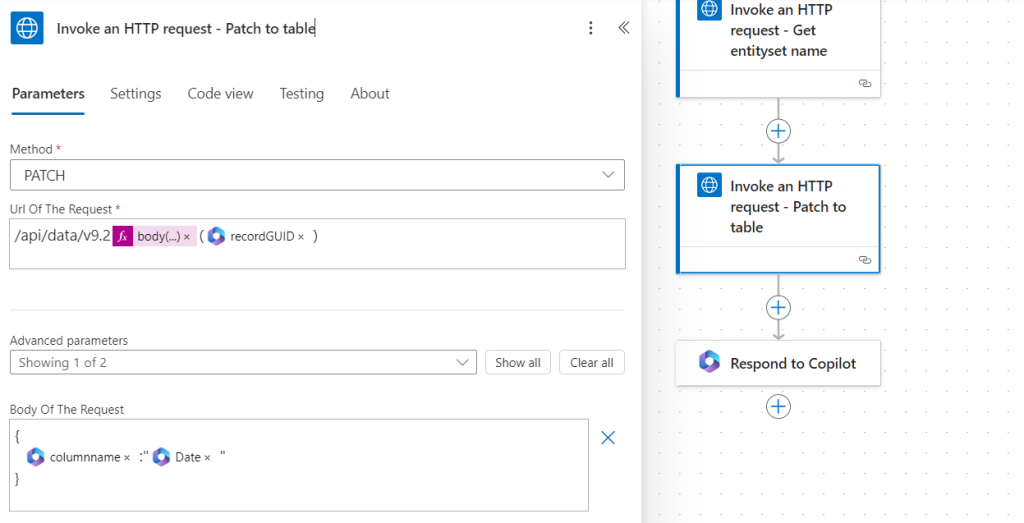
/api/data/v9.2/@{body('Invoke_an_HTTP_request_-_Get_entityset_name')?['value']?[0]?['EntitySetName']}(@{triggerBody()?['text_3']}){ @{triggerBody()?['text']}:"@{triggerBody()?['date']}" }d - This will be closed out by an empty respond to co pilot action
Within the studio, add the call flow action. For the date ensure to wrap it in the date value PowerFX formula
Text(DateValue(Topic.varRequestupdatedate), "yyyy-mm-dd")
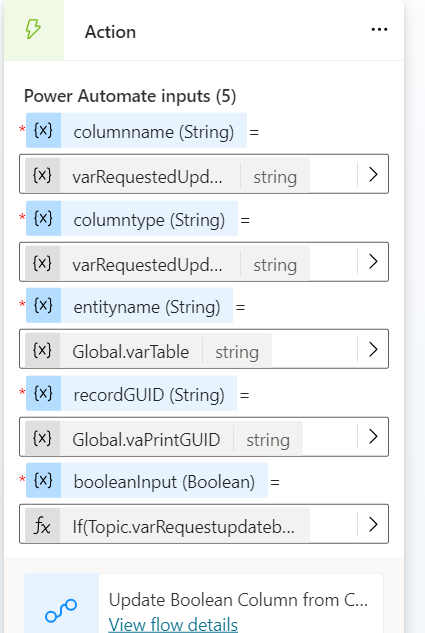
Power Automate - Update Boolean
The flow will be very similar to the one above with the biggest difference being that the trigger will use a Boolean vs a date
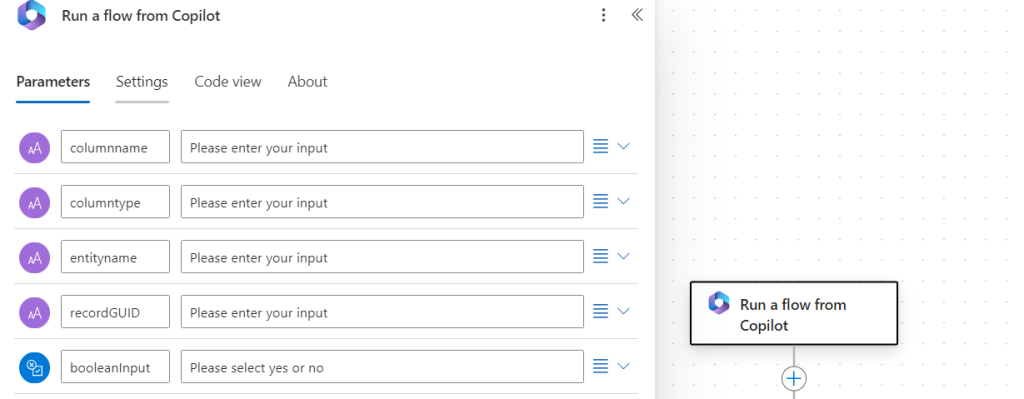
- Add the trigger with the following inputs
- As before, add two http actions, on to get the entity set name and one to preform the patch
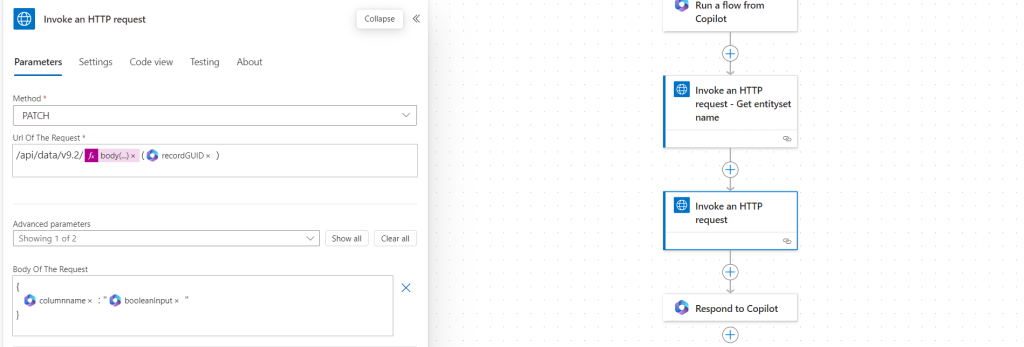
/api/data/v9.2/@{body('Invoke_an_HTTP_request_-_Get_entityset_name')?['value']?[0]?['EntitySetName']}(@{triggerBody()?['text_3']}){ @{triggerBody()?['text']}: "@{triggerBody()?['boolean']}" } - This will be closed out by an empty respond to co pilot action
Within the studio add the call flow action. For the date ensure to wrap it in the datevalue PowerFX formula
If(Topic.varRequestupdateboolean= "True", true, false)
Power Automate - Update String
- Add the trigger with the following inputs
- As add two http actions, on to get the entity set name and one to preform the patch
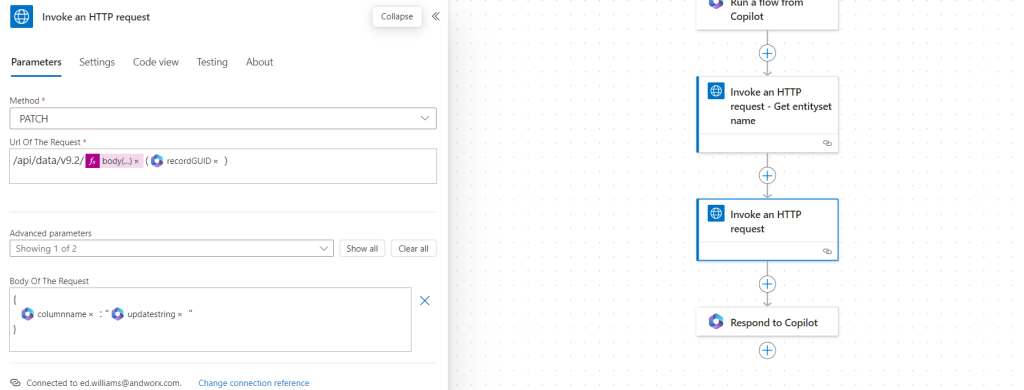
/api/data/v9.2/@{body('Invoke_an_HTTP_request_-_Get_entityset_name')?['value']?[0]?['EntitySetName']}(@{triggerBody()?['text_3']}){ @{triggerBody()?['text']}: "@{triggerBody()?['text_4']}" } - This will be closed out by an empty respond to co pilot action
Topic flow - Part 4 Close it out and loopback
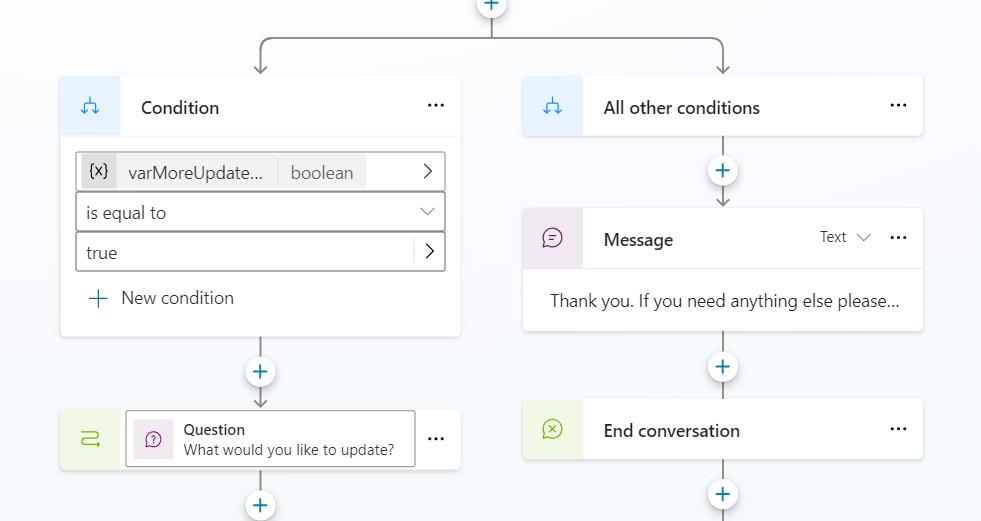
The last step will be to ask the user if there are any other fields to update
- After all the conditions, add a question that asks the user if there are any other fields to update
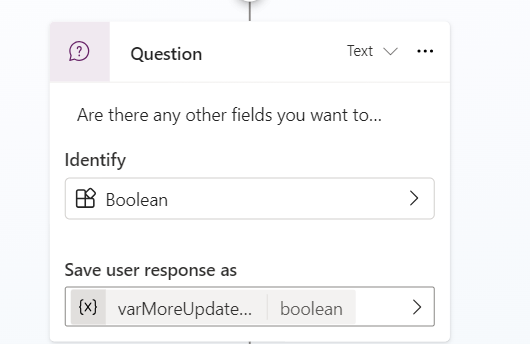
- If the output is true loop back to the Question “What would you like to update”, else end the conversation.

I think there are quite a few things that can be done to improve this. I really want to get the generative flows along with less reliance on Power Automate.