
With the solution in place we now need to have a way to capture the approvals on the form, have a way to resubmit if denied, then send for final approval to our branch chief.
Approval outcomes
New Columns
In the main form we now need to show what the outcome is of the approvals. As much as I want to simply use the Approvals table to show what the outcome of the approval was, all the forms within the entity are restricted and the Results (msdyn_flow_approval_result), is not able to be added. Instead we will create two columns in our projects table that will store the outputs.
- In the projects table create a choice column called Team Lead Approval Choice
- Create a new global choice called Project Approval
- Pending
- Approved
- Denied
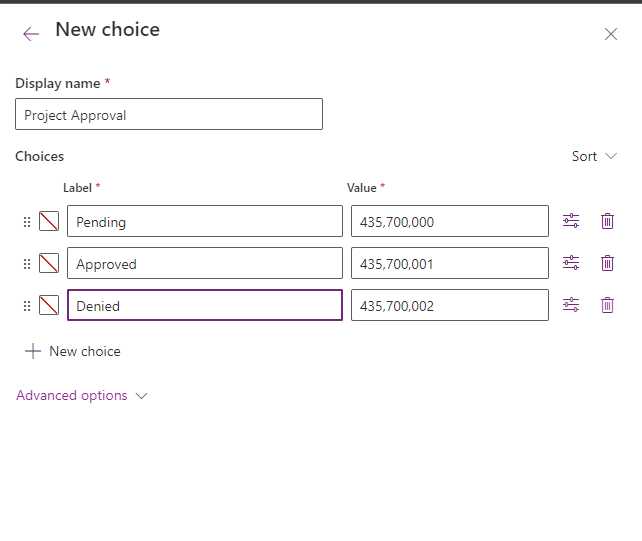
- Set the default option to Pending

- Create another column called Brach Chief Approval Choice using the same settings as above
Team Lead Flow
- Open the 1.1 - When a new Project is Requested (Power Platform Management) flow
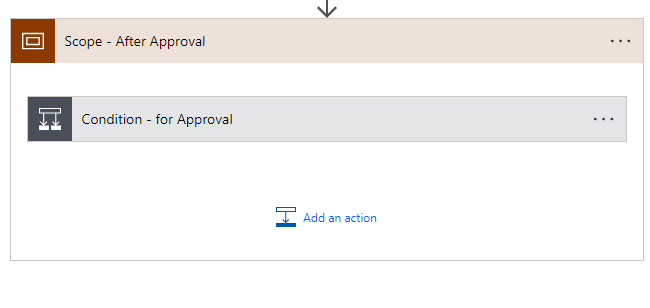
- In the After Approval Scope we are going to add two actions. One if it is approved and one if it is denied.
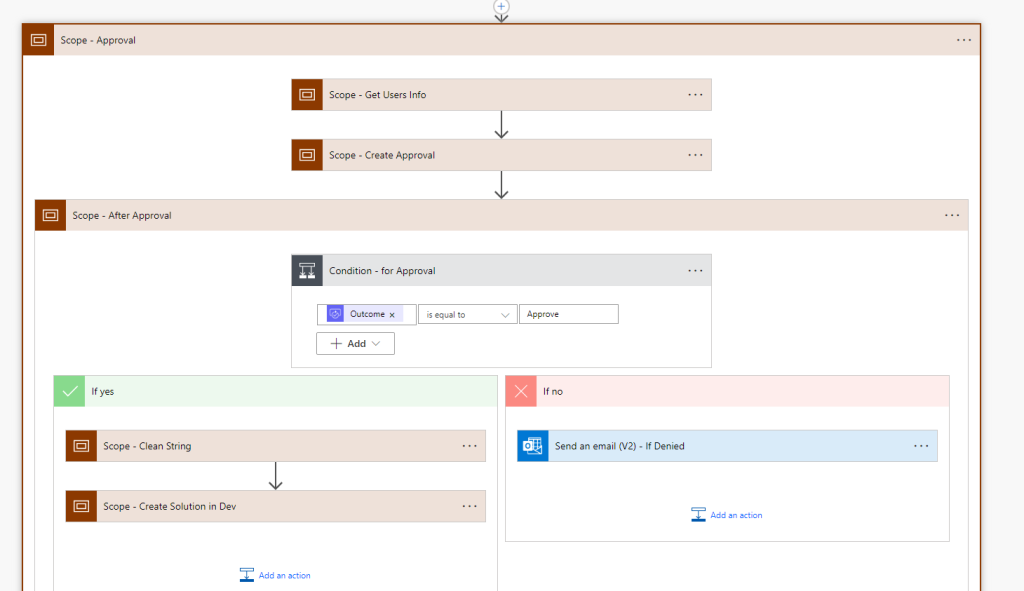
- Under the If yes leg on the Condition Open the “Scope - Create Solution in Dev” then the Update a row - Project with solution ID Action
- Update the Team Lead Approval Choice to “Approved”

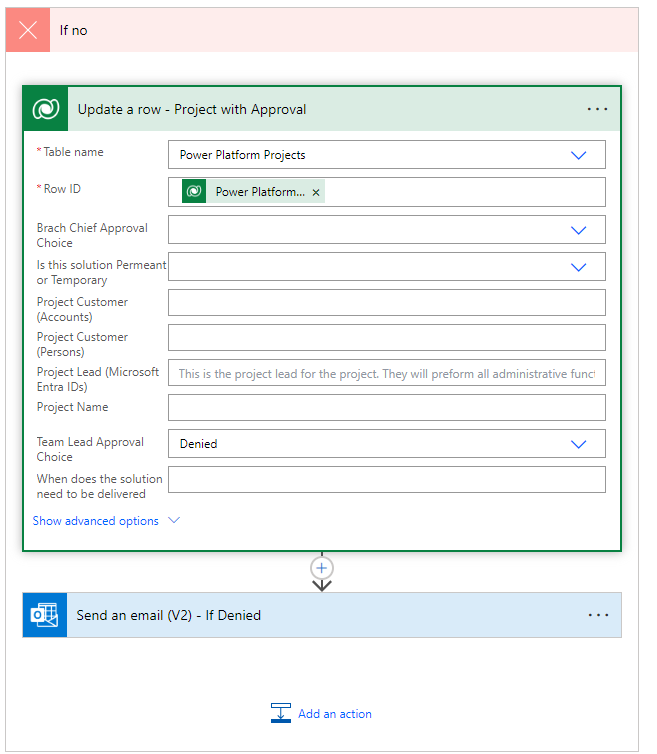
- Under the If no leg on the Condition, add a new Action to update the projects table Team Lead Approval Choice to “Denied”
Approval Tab Updates
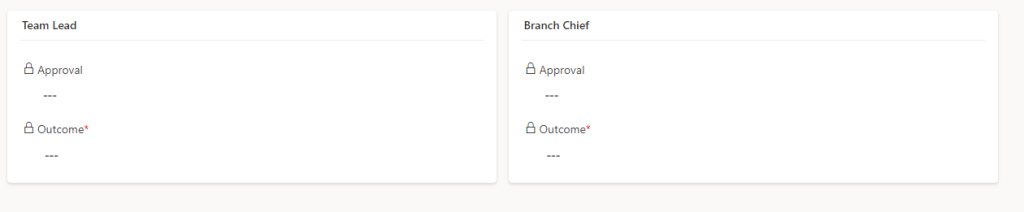
With the Team lead flow updated we now need to update the form to show the output of the approvals
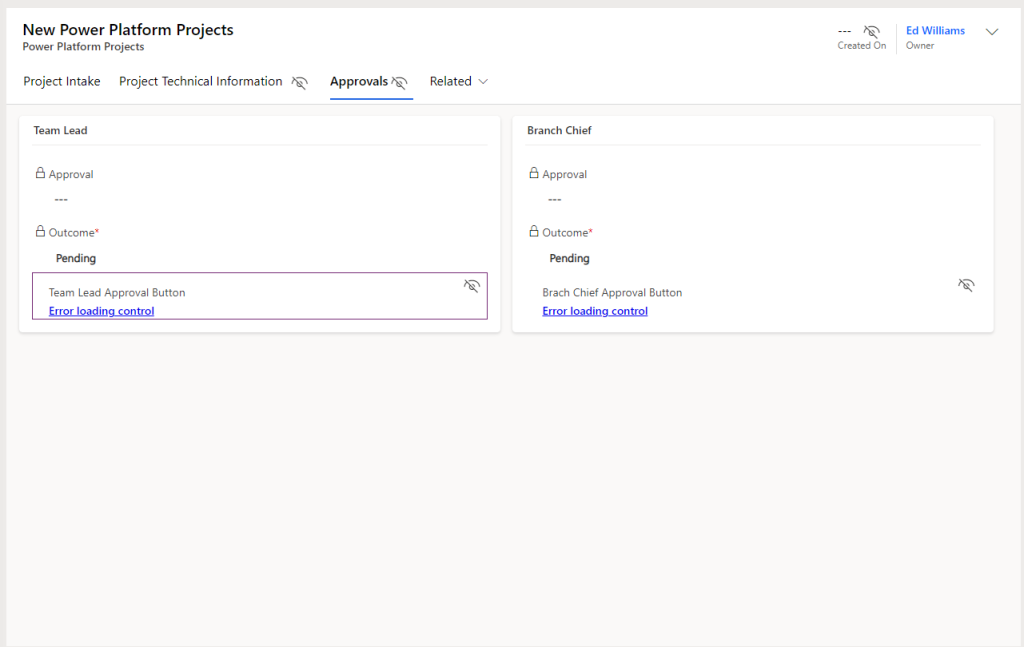
- Open up the main form of the projects table and navigate to the Approvals tab
- Add the team lead and branch chief approval choices to their respective locations then mark them as read only
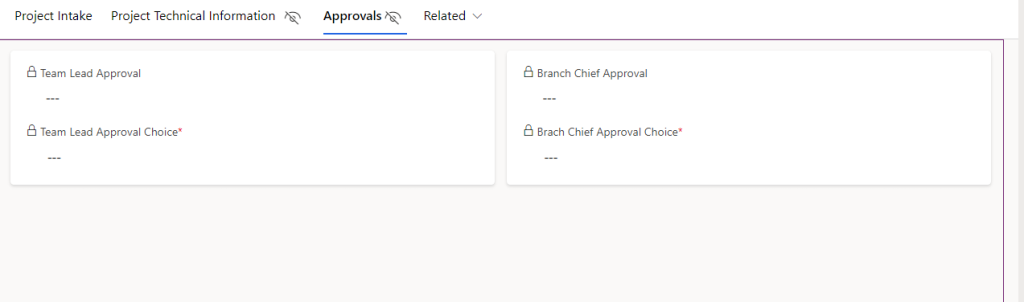
- Update the sections with their respective headers, then rename each field to Approval and Outcome
Buttons
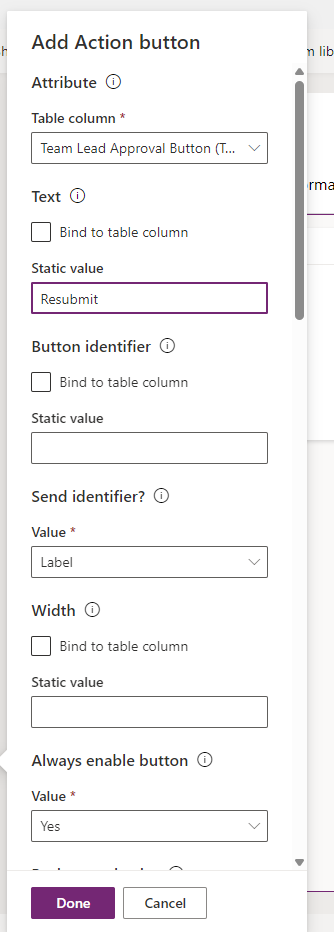
- Next we will need to add a button to the Team lead section to resubmit the approval if it has been denied. We will use the Action Button found within the MScrmTools PCF controls MscrmTools (MscrmTools) · GitHub. The Action Button is the best way to trigger an update from the MDA from without having to add in a Canvas App or custom HTML page. Download the PCF controls Releases · MscrmTools/PCF-Controls (github.com) then import it into your environment.
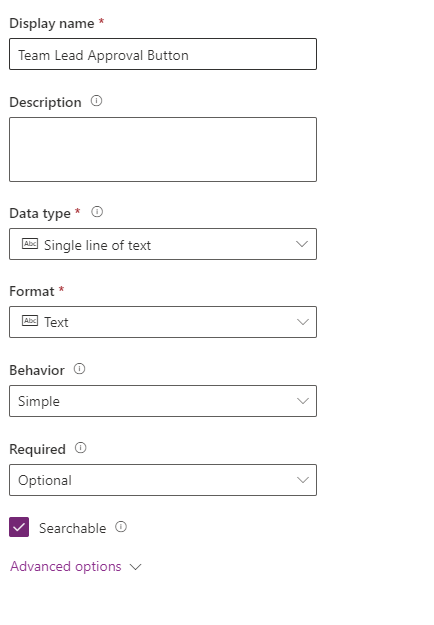
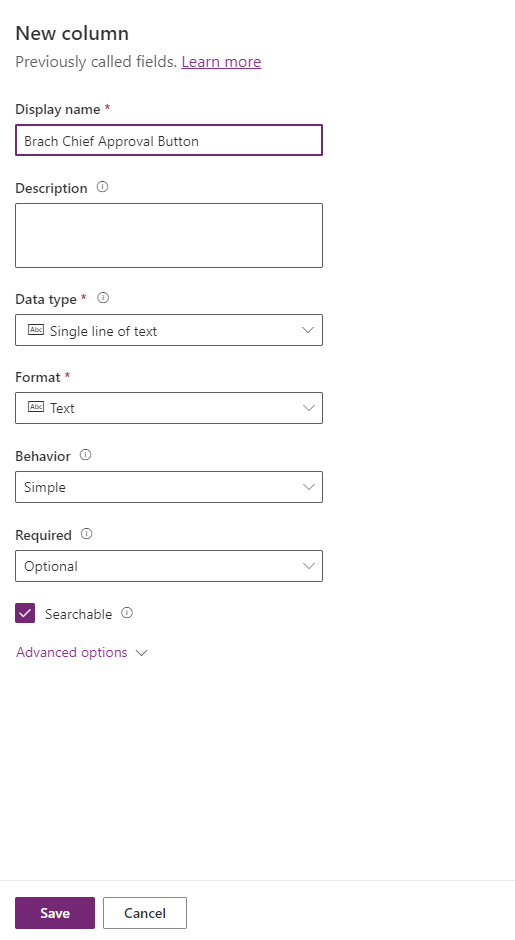
- Now we will need to add two columns to serve as the “holder” of the buttons. While we could simply attach the Action Button to the existing choice columns, adding these two will allow us greater flexibility in the future. Each of these buttons will be a simple string column set to Optional.
- The first column will be called Team Lead Approval Button
- The second column will be called Brach Chief Approval Button
- Add the first Action Button in the Team leads section and give it a text name is “Resubmit”.
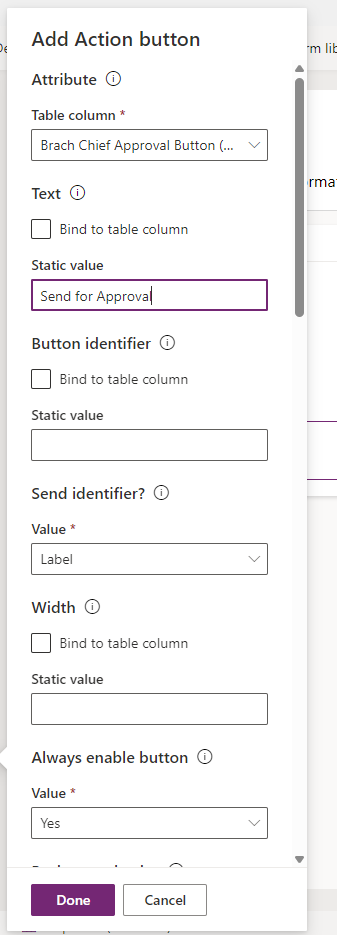
- Add the second button in the Branch Chief section and give is a text label of “Send for Approval”
Button Business Rules
- Because the buttons only need to be visible when the approval is Denied, we will create a business rule for each column to show them based off of the approval status.
- For the Team Lead Approval Button create a new business rule called Show Team Lead Approval Button if Denied
- For the Condition set if the Team Lead Approval Button is 1st Rejection AND if the status is Active
💡 Note: I updated the 1.1 flow so that if it is rejected it will set the field value to 1st Rejection
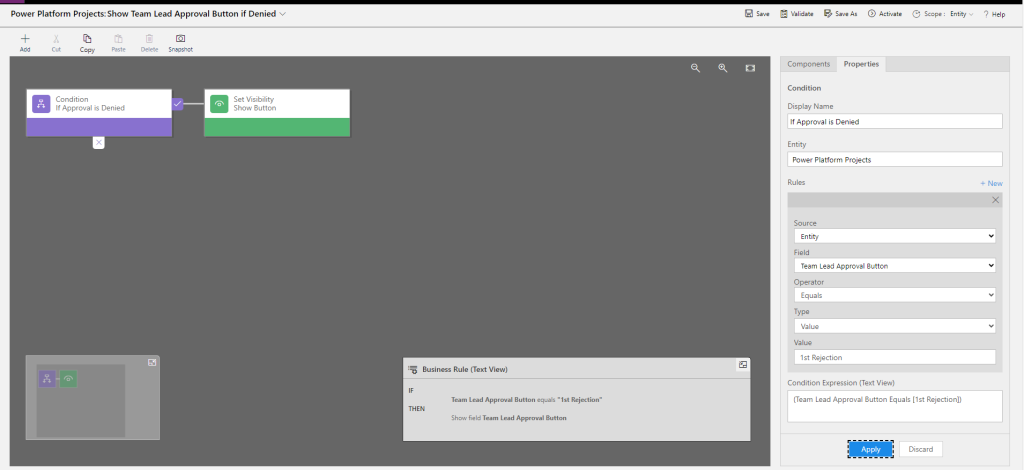
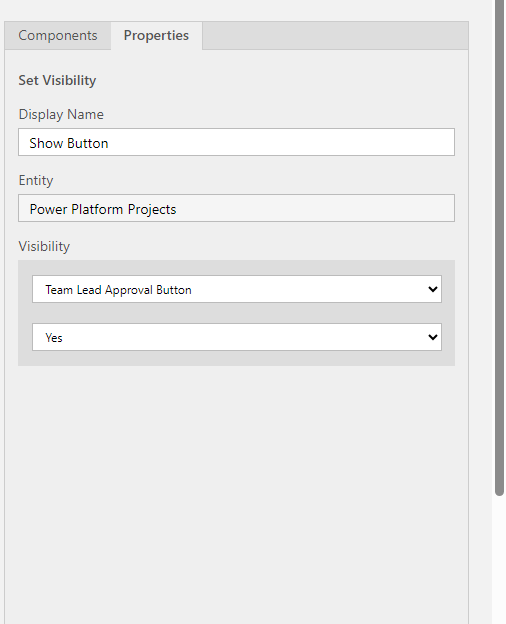
- Add a Visibility Action for the Team Lead Approval Button to yes
- Save and Activate the rule
- Create a second business rule called Show Branch Chief Approval Button if Team lead has approved. We only want this button to be visible if the Team lead has approved the original request.
- For the Condition set if the Branch Chief Approval Button to equal Pending AND if the status is Active
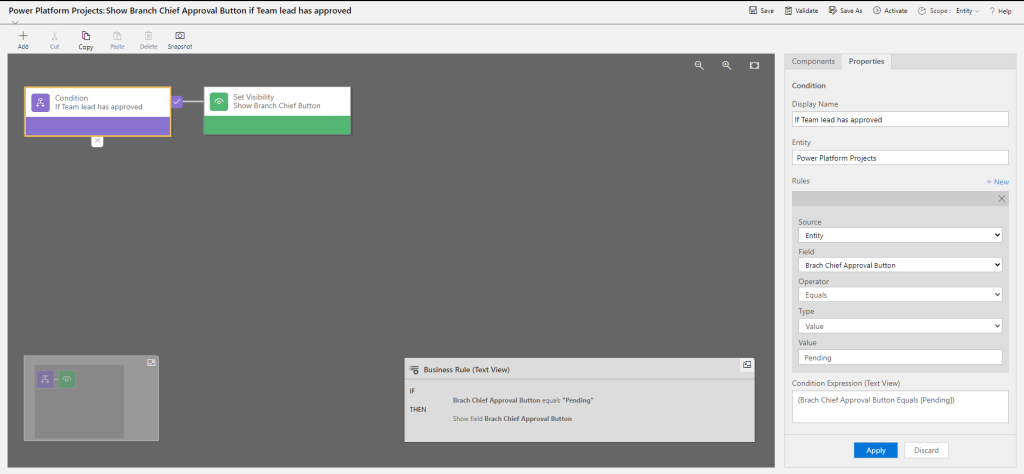
- Add a Visibility Action for the Branch Chief Approval Button to yes
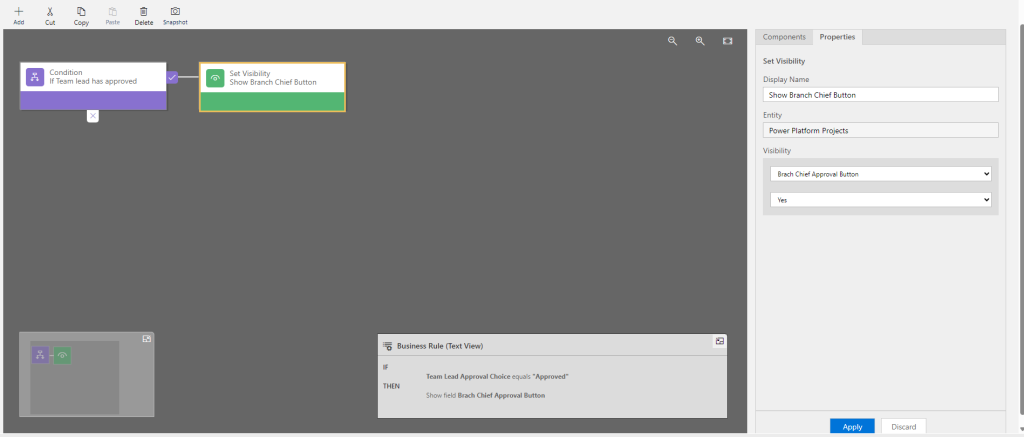
- Save and Activate the rule
- Finally in the form set the visibility of each of the buttons to hidden
Button Actions
To make the action buttons work we will need to write a bit of JavaScript. The JavaScript will do two things. First it set the button columns to “Resubmit” and the Choice columns to “Pending”
function onChange(context) {
  let attribute = context.getEventSource();
  let value = attribute.getValue();
  let formContext = context.getFormContext();

  // Get the team lead approval choice attribute
  let approvalChoice = formContext.getAttribute("andy_teamleadapprovalchoice");

  if (value != null) {
    Xrm.Navigation.openAlertDialog({ text: "Request has been submitted!" });
    // Set the value of the team lead approval button to Resubmit
    attribute.setValue("Resubmit");
  }

  // Check if the approvalChoice attribute exists and set its value to Pending
  if (approvalChoice != null) {
    approvalChoice.setValue(435700000);
    // Save the form to ensure changes are applied
    formContext.data.entity.save();
  } else {
    console.error("andy_teamleadapprovalchoice attribute not found.");
  }
}
Flow
With the button in place we now need to send a new approval to the team lead
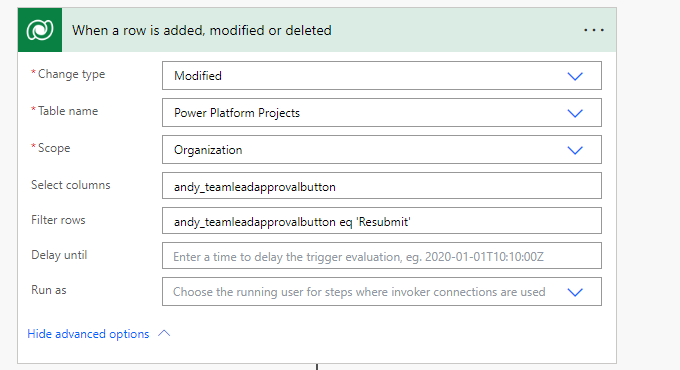
- Create a new flow called 1.2 - Resubmit request to Team lead
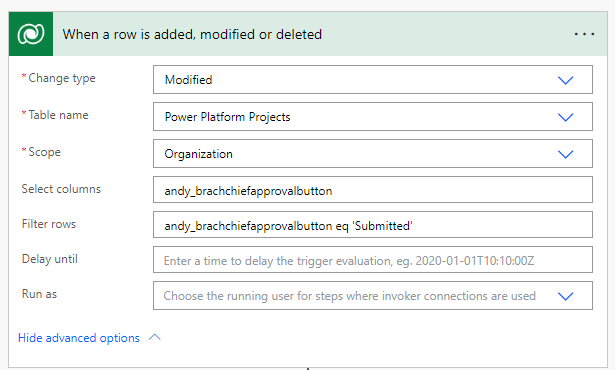
- The trigger will be when a row is modified in the projects table, it will only fire if the column andy_teamleadapprovalbutton is updated to Resubmit
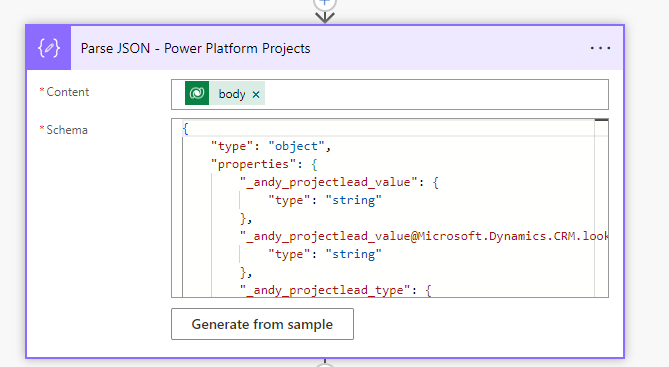
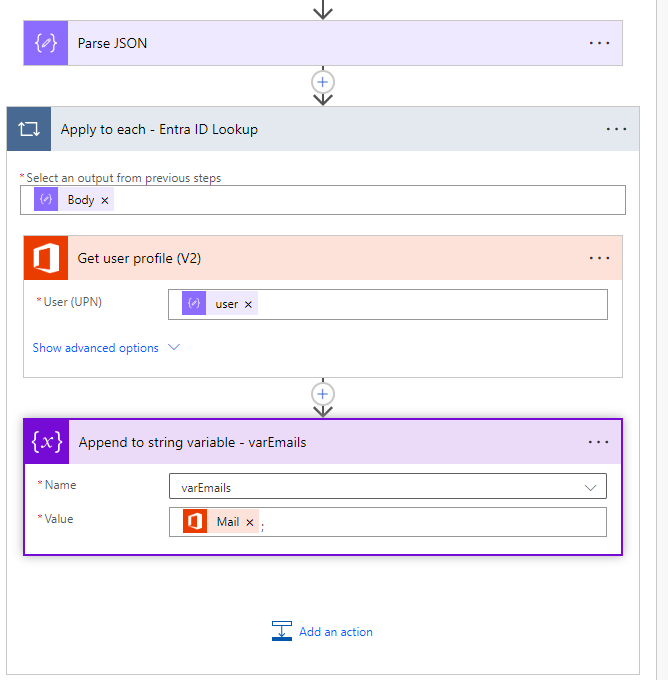
- Add a Parse JSON to parse the Dataverse output
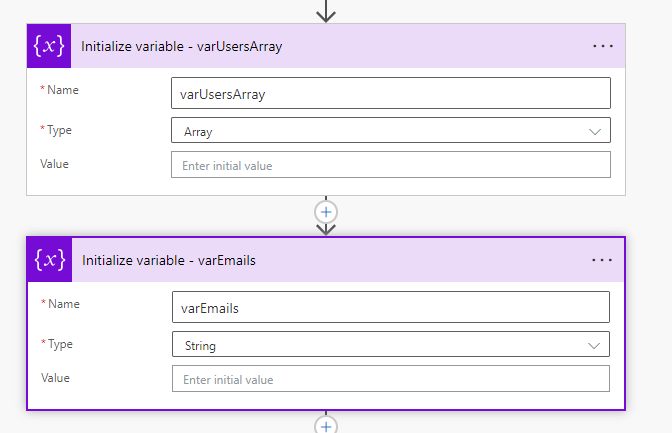
- Add two variables varUsersArray (array) and varEmails (String)
- Create a scope called Scope - Gert User
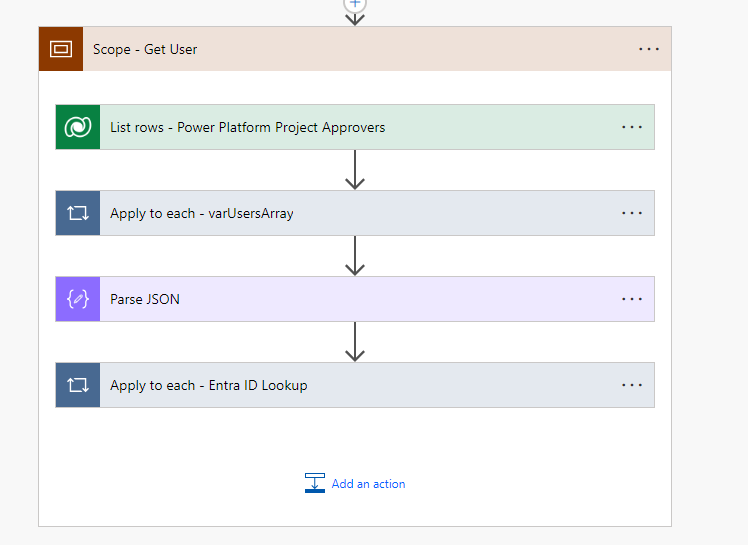
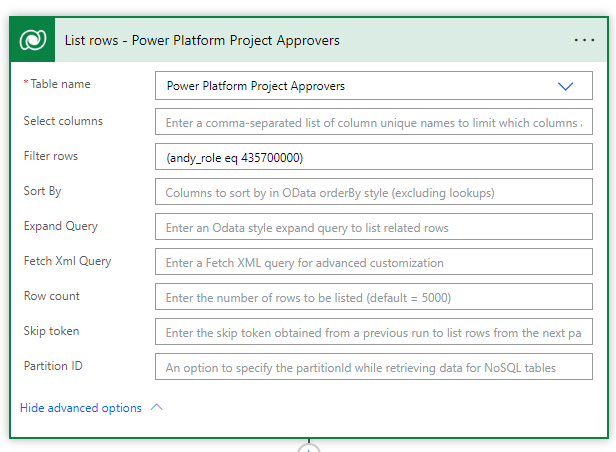
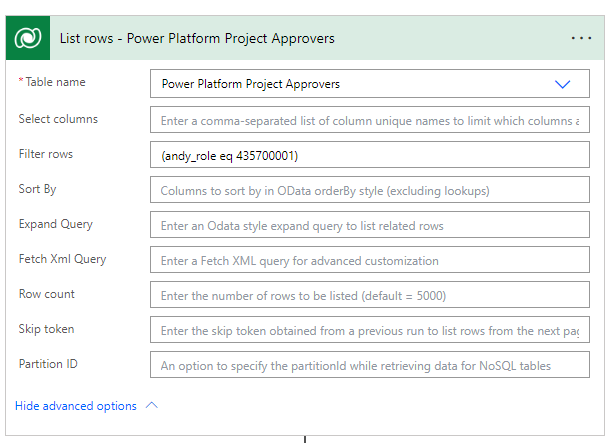
- Add a Dataverse List rows action that lists all the rows of the approvers table with the Team lead role.
- In an apply to each loop, append to the varUsersArray the POC value
items('Apply_to_each_-_varUsersArray')?['_andy_poc_value']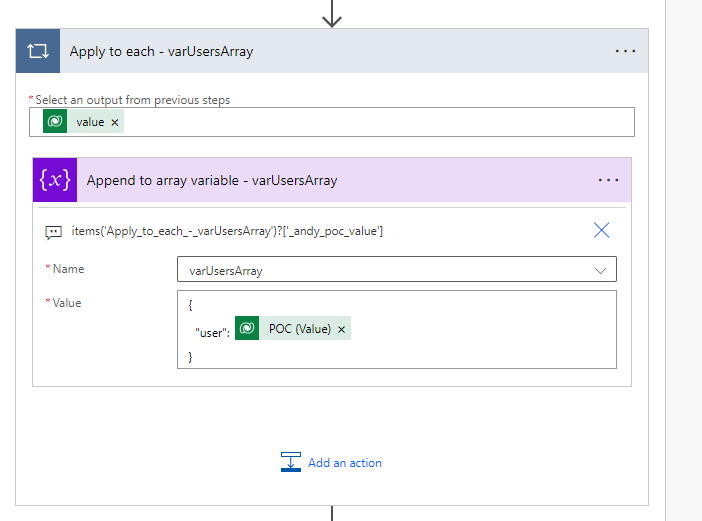
- Parse the JSON of the array
- Then in another apply to each look lookup the users profile and append to the string variable “varEmails”, the users Mail.
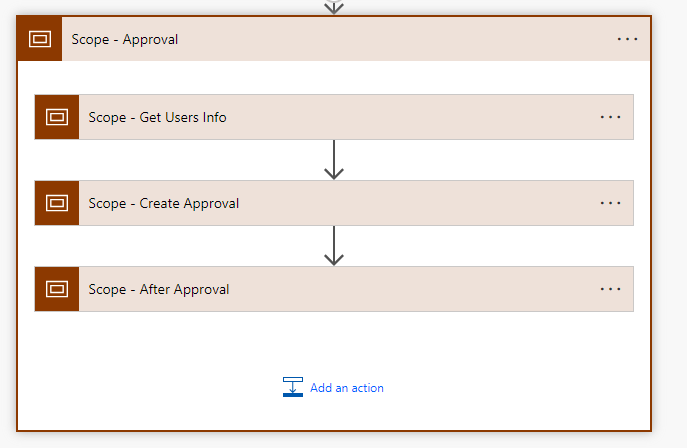
- Create another Scope Called Approval that contains three scopes
- Get Users Info
- Create Approval
- After Approval
- In the Get Users Info Scope add three actions
- Get a row by ID - Modified By
- Get a row by ID - Customer
- Get user profile (V2) - Project Lead
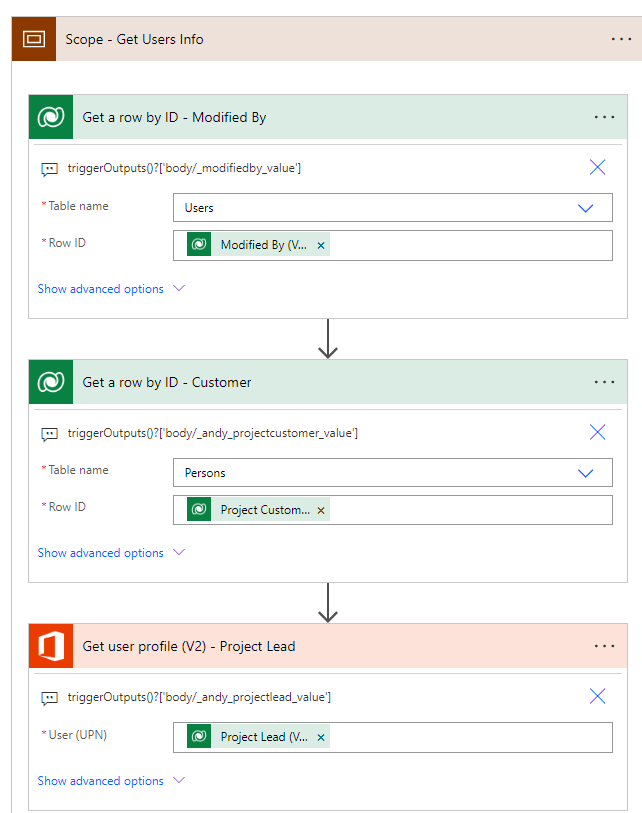
- For the Get a row by ID - Modified By set the Row ID to the modified by of the trigger
- For the Get a row by ID - Customer set the Row ID to the projects customer from the trigger
- For the Get user profile (V2) - Project Lead use the UPN of the project lead from the trigger
- In the Create Approval Scope add four actions
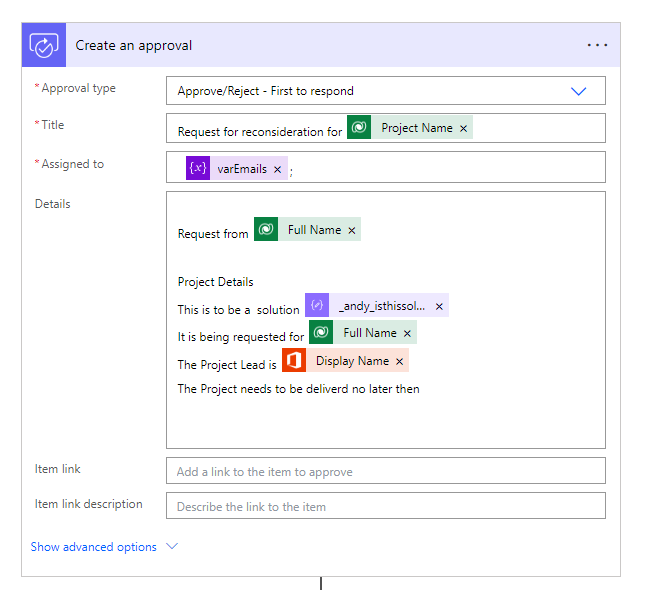
- Create an Approval
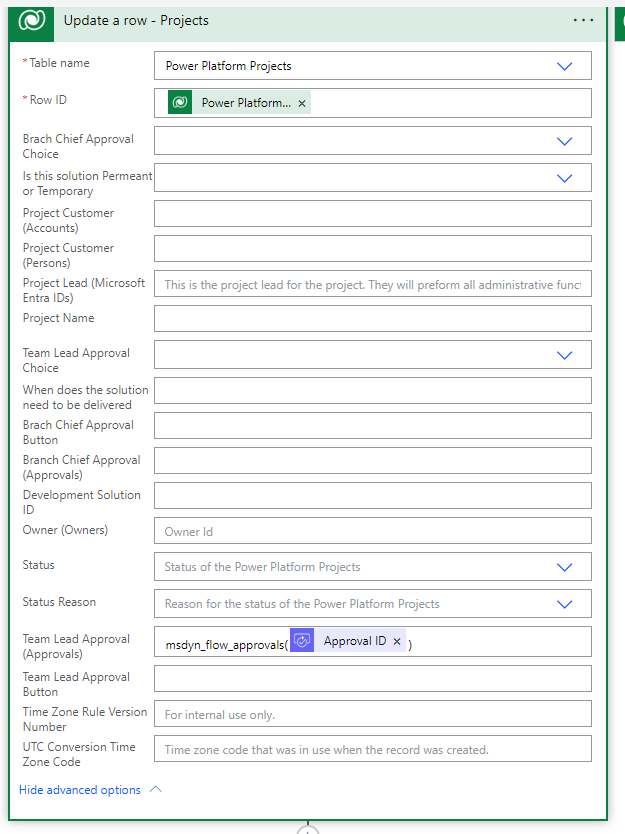
- Update a row - Projects
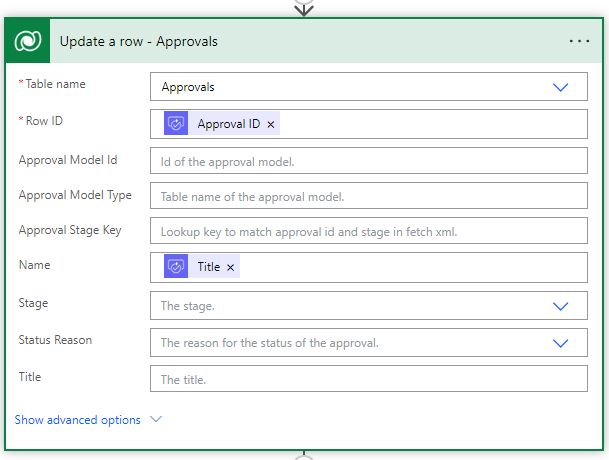
- Update a row - Approvals
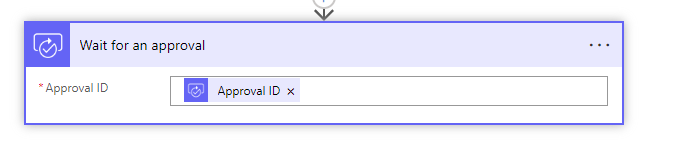
- Wait for an approval
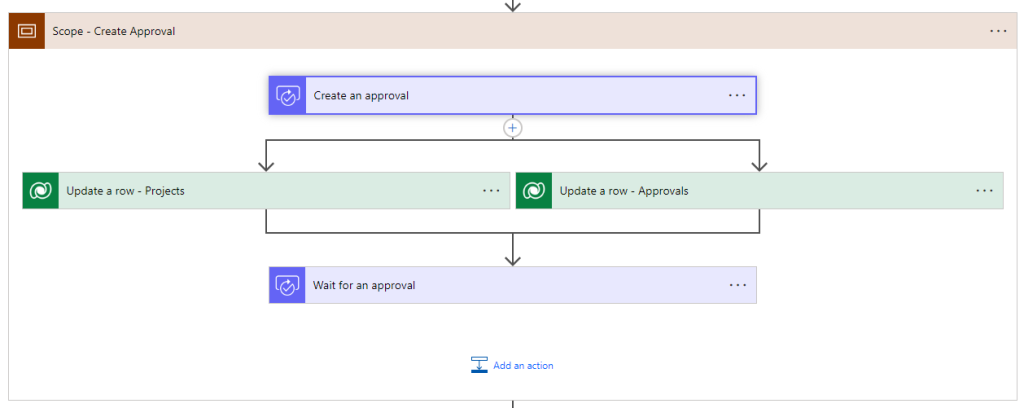
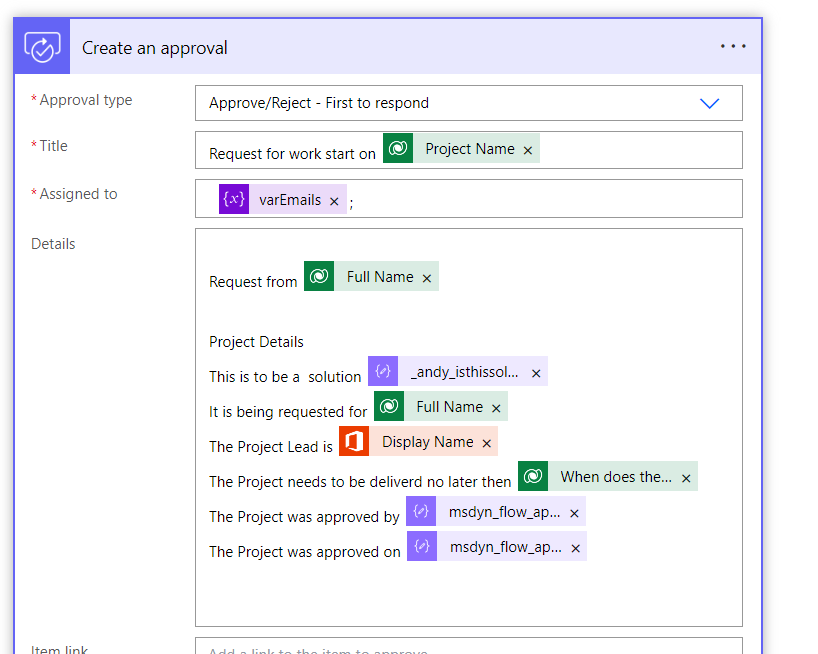
- For the Create an approval set it as follows
- For the Update a row - Projects, we will update the update the approval from the original one to the newly created one
- For the Update a row - Approvals we will update the Name to the title of the Approval
- Then finally for the Wait for an approval, we will set it to the ID of the approval request from above.
- We now need to create one last scope called After Approval
- Add a Condition using the outcome of the Approval is equal to Approve
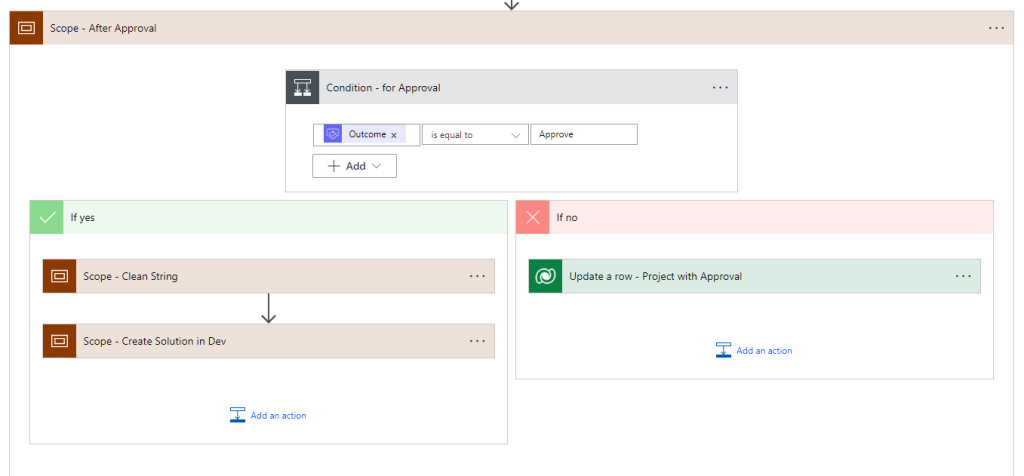
- If the Approval is yes it will follow the same steps called out in part four of this series to clean the string, create the solution and send an email to the developer.
- If no, we will update the project to be Inactive and the Team Lead Approval to Denied

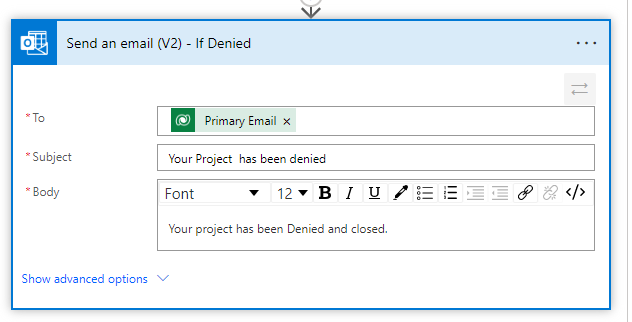
- We will finally add a send an email action to notify the developer that the project has been rejected
Submit the Branch Chief Button
With the team lead now completed we will need to set the actions for the Brach Chief Approval Button. We are going to follow the same steps as above by setting the Brach Chief Approval Button to “Submitted”. The Action button will use the following JavaScript.
function onChange(context) {
  let attribute = context.getEventSource();
  let value = attribute.getValue();
  let formContext = context.getFormContext();

  if (value != null) {
    Xrm.Navigation.openAlertDialog({ text: "Request has been submitted!" });
    // Set the value of the team lead approval button to Resubmit
    attribute.setValue("Submitted");
  }
}
This will set the button column to Submitted when selected.
The Flow to create the approval will be a copy of the 1.2 flow from above with a few updates
- The Trigger will be updated to the use the Branch Chief Approval Button
- The Approvers will be updated to use the Branch Chief Role (435700001)
- Inside the Approval Scope we will add another scope called Scope - Get Team Lead Approval Info
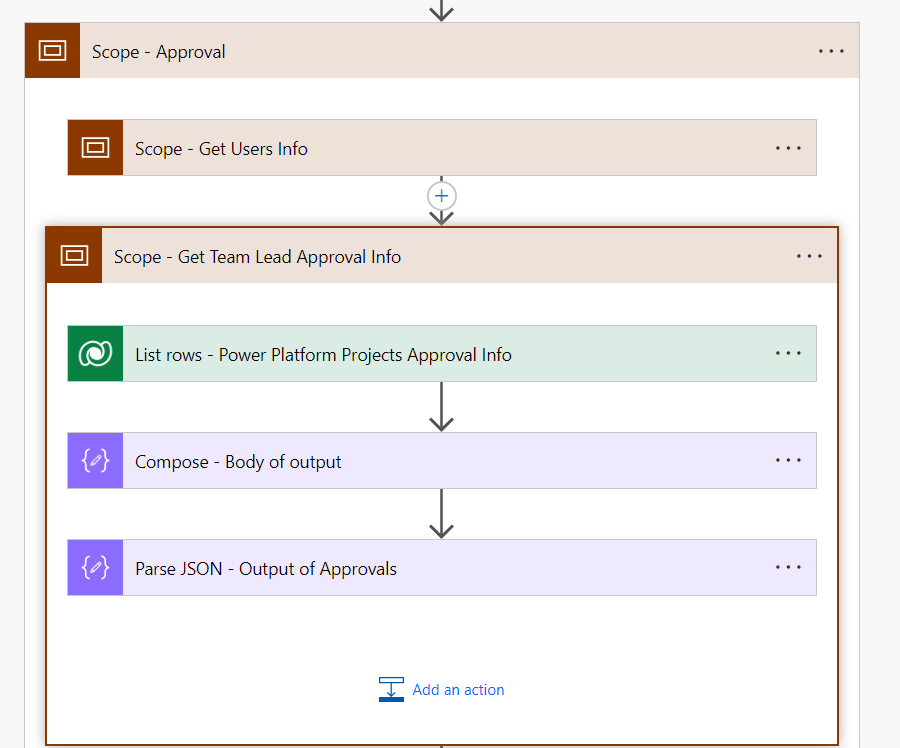
- Add a list rows that looks up to the projects table
- To get the information we need (Approved by and when) we will use a FetchXML statement (I used FetchXML Builder to write the whole query)
<fetch top="1"> <entity name="andy_powerplatformprojects"> <filter> <condition attribute="andy_powerplatformprojectsid" operator="eq" value="@{triggerOutputs()?['body/andy_powerplatformprojectsid']}"/> </filter> <link-entity name="msdyn_flow_approval" from="msdyn_flow_approvalid" to="andy_teamleadapproval"> <link-entity name="msdyn_flow_approvalresponse" from="msdyn_flow_approvalresponse_approval" to="msdyn_flow_approvalid"> <attribute name="modifiedby" /> <attribute name="msdyn_flow_approvalresponse_response" /> <attribute name="ownerid" /> <attribute name="modifiedon" /> </link-entity> </link-entity> </entity> </fetch> - Two actions are then added, one to collect the output of the lookup and one to parse the JSON. The output is filtered to only allow for one item to be selected so a for all loop is avoided.
outputs('List_rows_-_Power_Platform_Projects_Approval_Info')?['body/value']?[0] - These are then added to the approval request
Approval Tab JavaScript
The last update for the form is to add a bit of JavaScript to the approvals tab. The JavaScript will hide the branch chief approval section until the team lead has approved the record.
show how to update the form
show how to add the script
function showSectionBasedOnChoice(executionContext) {
    let formContext = executionContext.getFormContext();

    // Get the attribute
    let approvalChoice = formContext.getAttribute("andy_teamleadapprovalchoice");
    if (!approvalChoice) {
      console.error("andy_teamleadapprovalchoice attribute not found.");
      return;
    }

    // Get the section
    let tab = formContext.ui.tabs.get("tab_approvals");
    let section = tab && tab.sections.get("tab_approvals_section_branchchief");
    if (!section) {
      console.error("tab_approvals_section_branchchief section not found.");
      return;
    }

    // Check if the choice equals 435700001
    section.setVisible(approvalChoice.getValue() === 435700001);
  }
Approval outcomes
With the current setup there is a possibilty that a team lead approves a project, a solution is created but then the branch chief rejects the work. Since the solution has already been created its is now possible to push the solution to production. To prevent this we will make two updates to the solution.
- Within the Scope Get solution info add a Condition to the very end
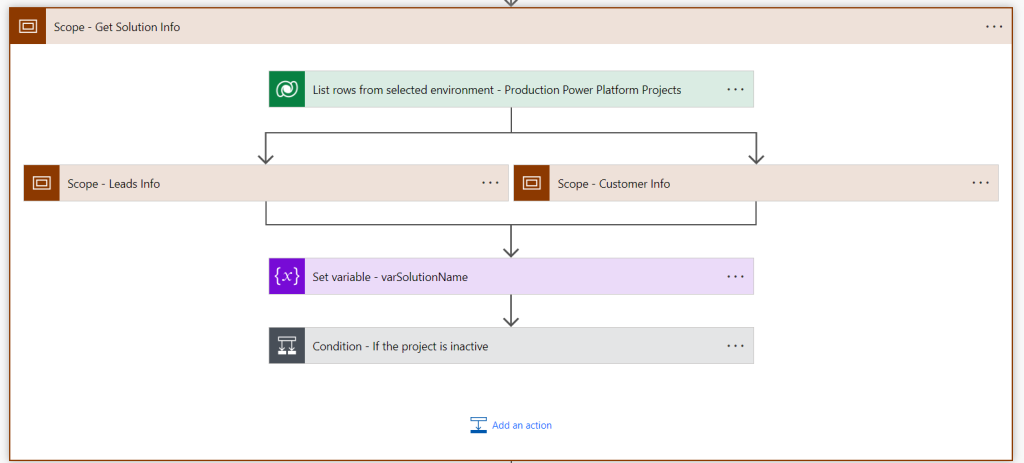
- Set the left hand value to the state code of the project request (in production), set the right to 1 (inactive)
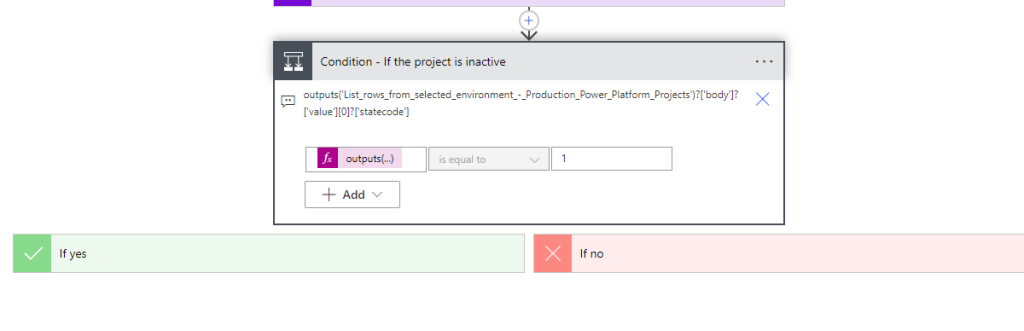
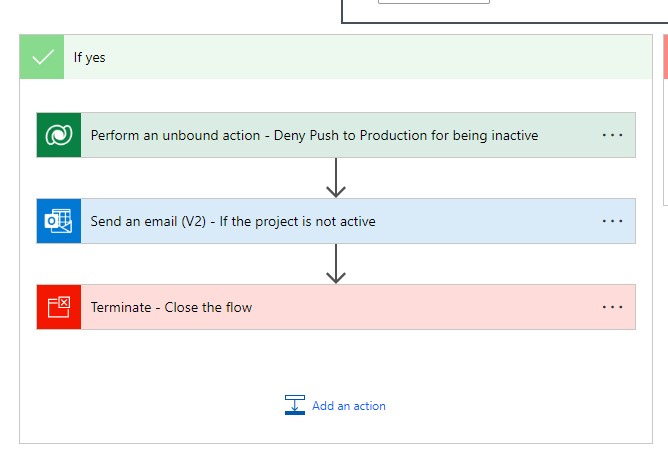
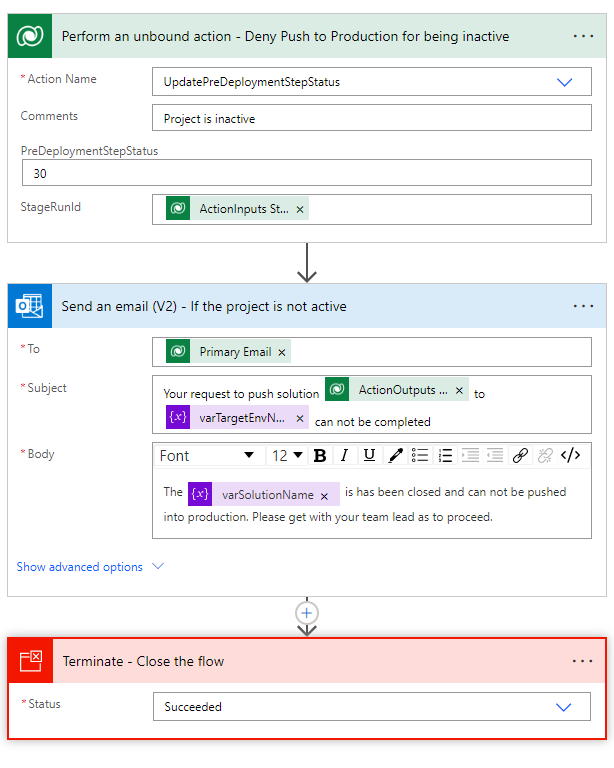
outputs('List_rows_from_selected_environment_-_Production_Power_Platform_Projects')?['body']?['value'][0]?['statecode'] - If the solution is inactive it will deny the push, send an email to the developer, then stop the flow
This was a lot! But this project is coming along nicely. In the next post we will be going over the environment watcher. A tool to help us know what solutions are being installed in each environment as they happen.